
To access the PDF of my Candy Dispenser Photo Essay, please follow this link here.
In my Stanford ME102: Foundations of Product Realization class, we focused a lot on taking our product design abilities to the next level, beyond rapid prototyping. We would design 3D models using Computer-Aided Design (CAD), and use laser-cutters or 3D printers to bring our designs to life. The class is a very thorough introduction to product realization, as the designs were not finished once they were 3D printed or laser-cut. We would continue to assemble our models using hardware provided for us in the Product Realization Lab, and we would even keep a bill of materials.
For my final project, I was tasked with the challenge of sketching, designing, prototyping, and digitally fabricating a candy dispenser, and I was only given the following criteria:
The candy dispenser must:
- store at least 20 artificial candies, which will be provided to you. Candies will be loaded without preference to position relative to one another.
- dispense only 1 candy per user actuation/input and reset for the next dispensing
- the dispensing action can be “passive” (such as a gumball machine where the gumball falls due to gravity)
- the dispenser can be “active” with some kind of launching action
- the dispenser can be “silly” and dispense back into itself (search “useless machine”)
- include a controlled, specific location for the dispensed “candy”; the “candy” cannot just drop onto the table below the dispenser.
- use rotary motion to actuate; this could be turning a knob or moving a lever through an arced path
- incorporate mechanical stock components, including:
- hardware for rotary motion (bushings, bearings, shafts, etc.)
- a spring (compression or extension) subject to a preload, hard stops, and a purely linear load between its endpoints.
- be operable with one hand
- fit within an approximately 6” X 6” X 6” volume
Skills/Programs Utilized:
- SolidWorks (Computer-Aided Design)
- Ultimaker CURA
- Laser-Cutter
- Ultimaker 3D Printer
- Adobe Illustrator
- Design Sketching
- Rapid Prototyping
Getting Started
In my initial brainstorming stages, I wanted to focus on these assignment requirements:
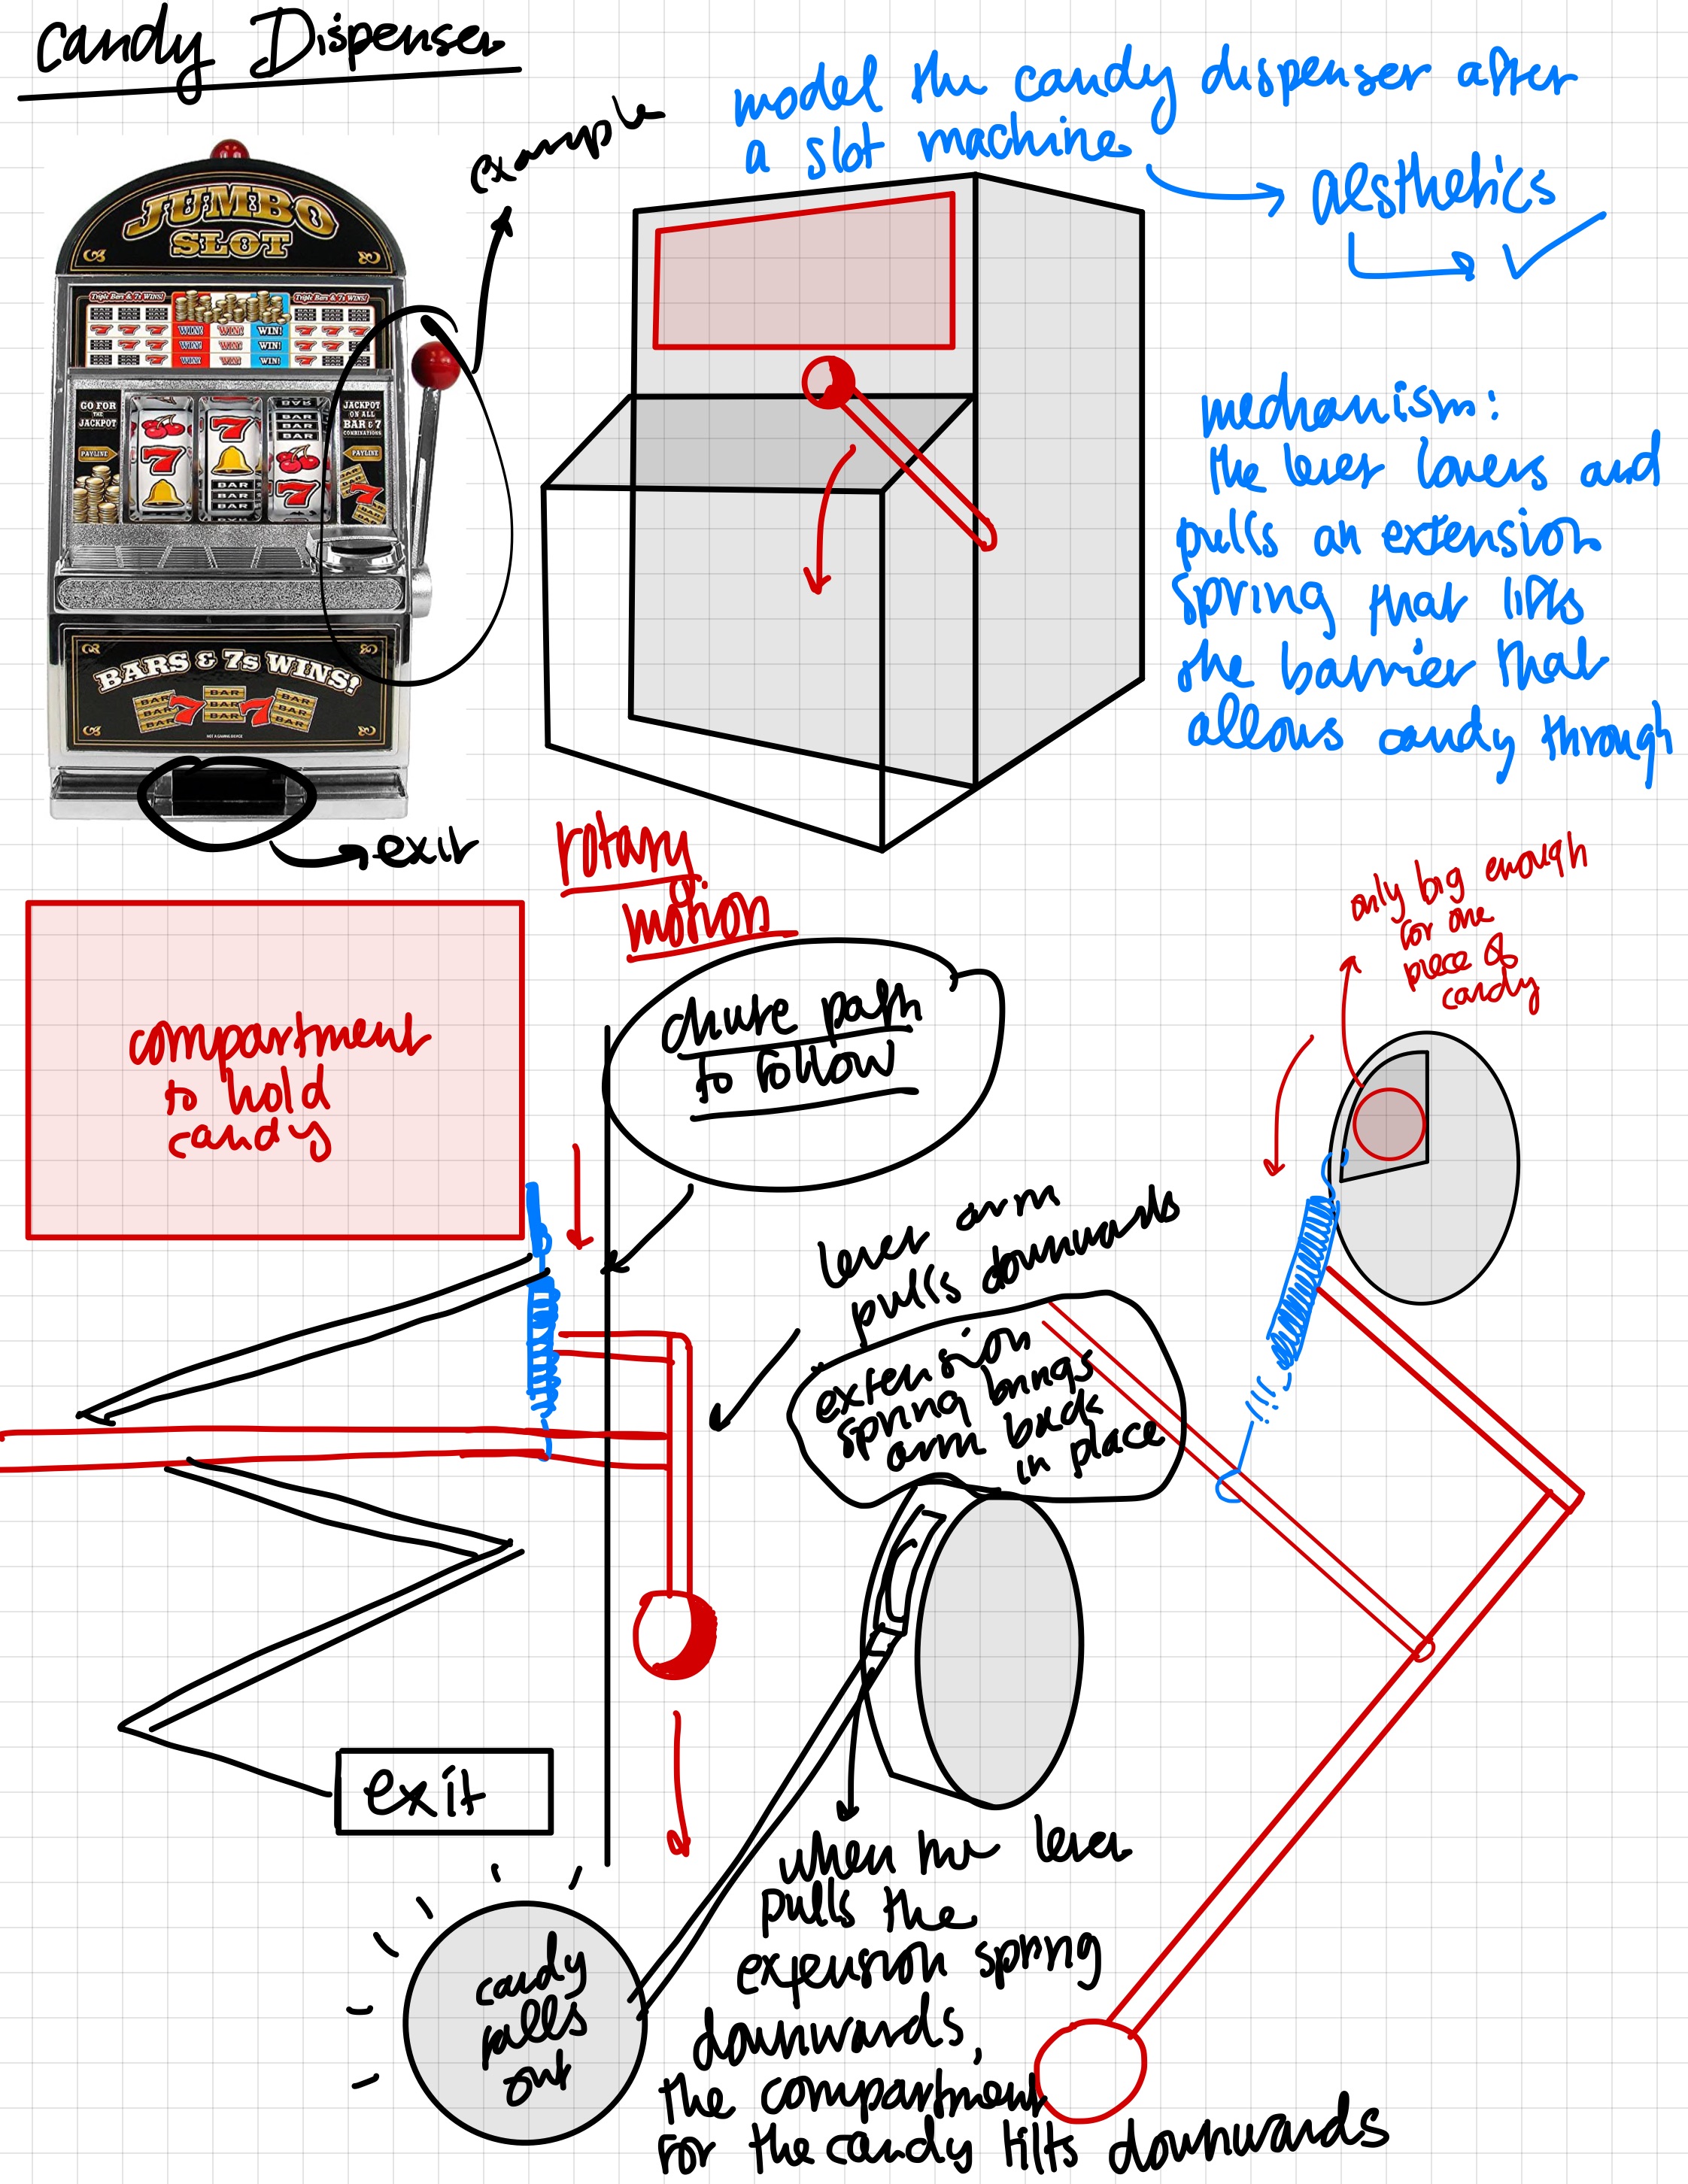
Use rotary motion to actuate
I took inspiration from slot machines, as the levers are pulled in arced paths, and the bar that extends from the lever handle can interact with the mechanism and ultimately dispense the candies.
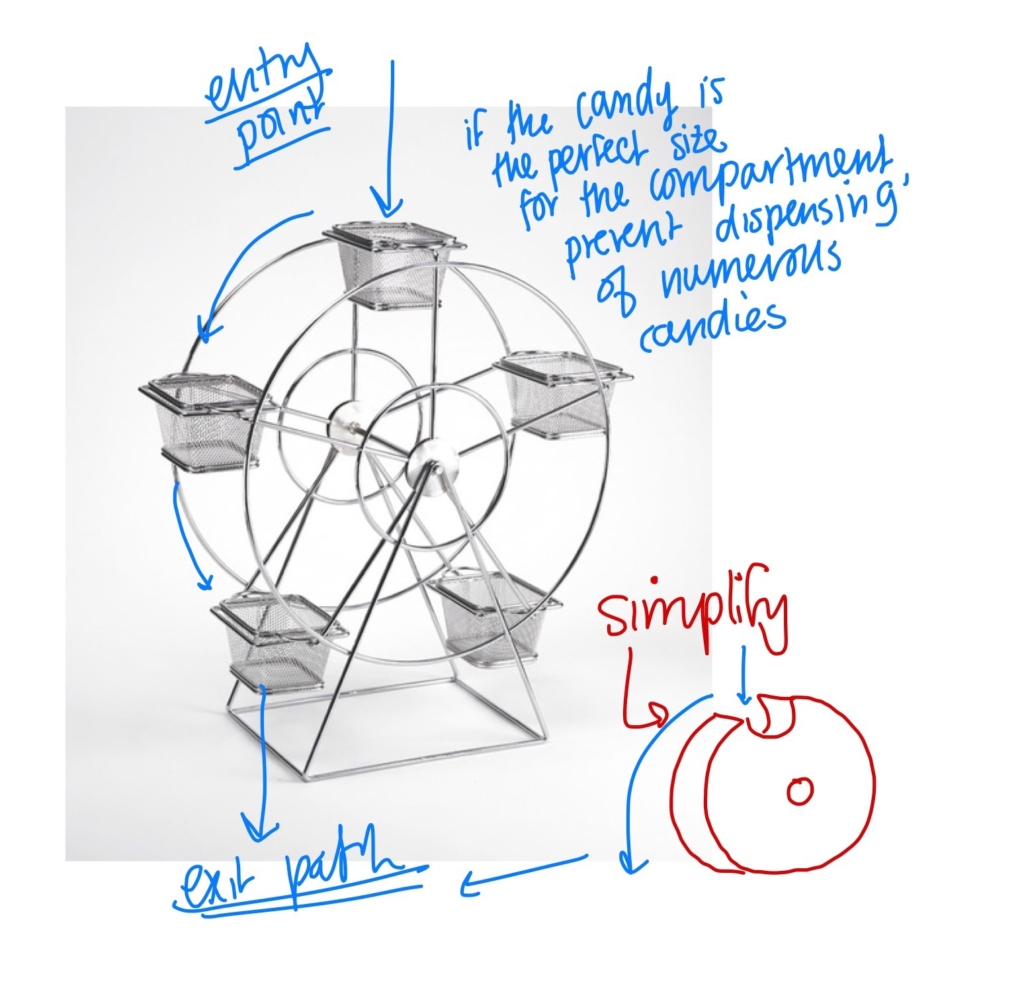
Dispense only 1 candy per user actuation/input and reset for the next dispensing
For the second condition, I took inspiration from ferris wheels, as a wheel of the right size can let me carry one piece of candy at a time and, with every rotation, it can dispense the candy individually.
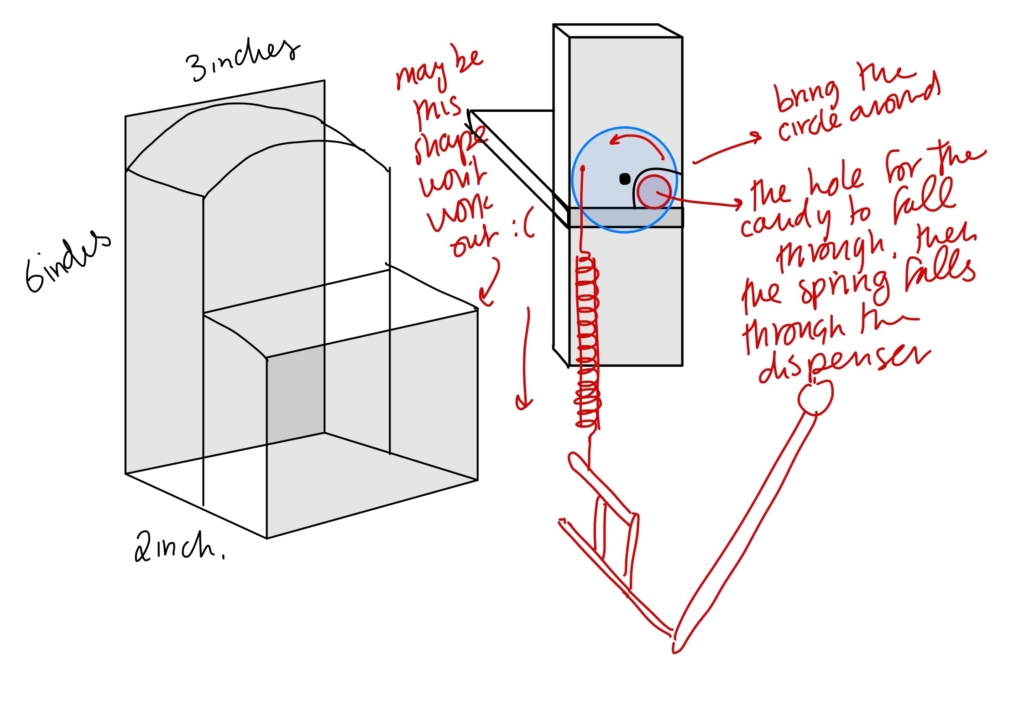
Refining the Design
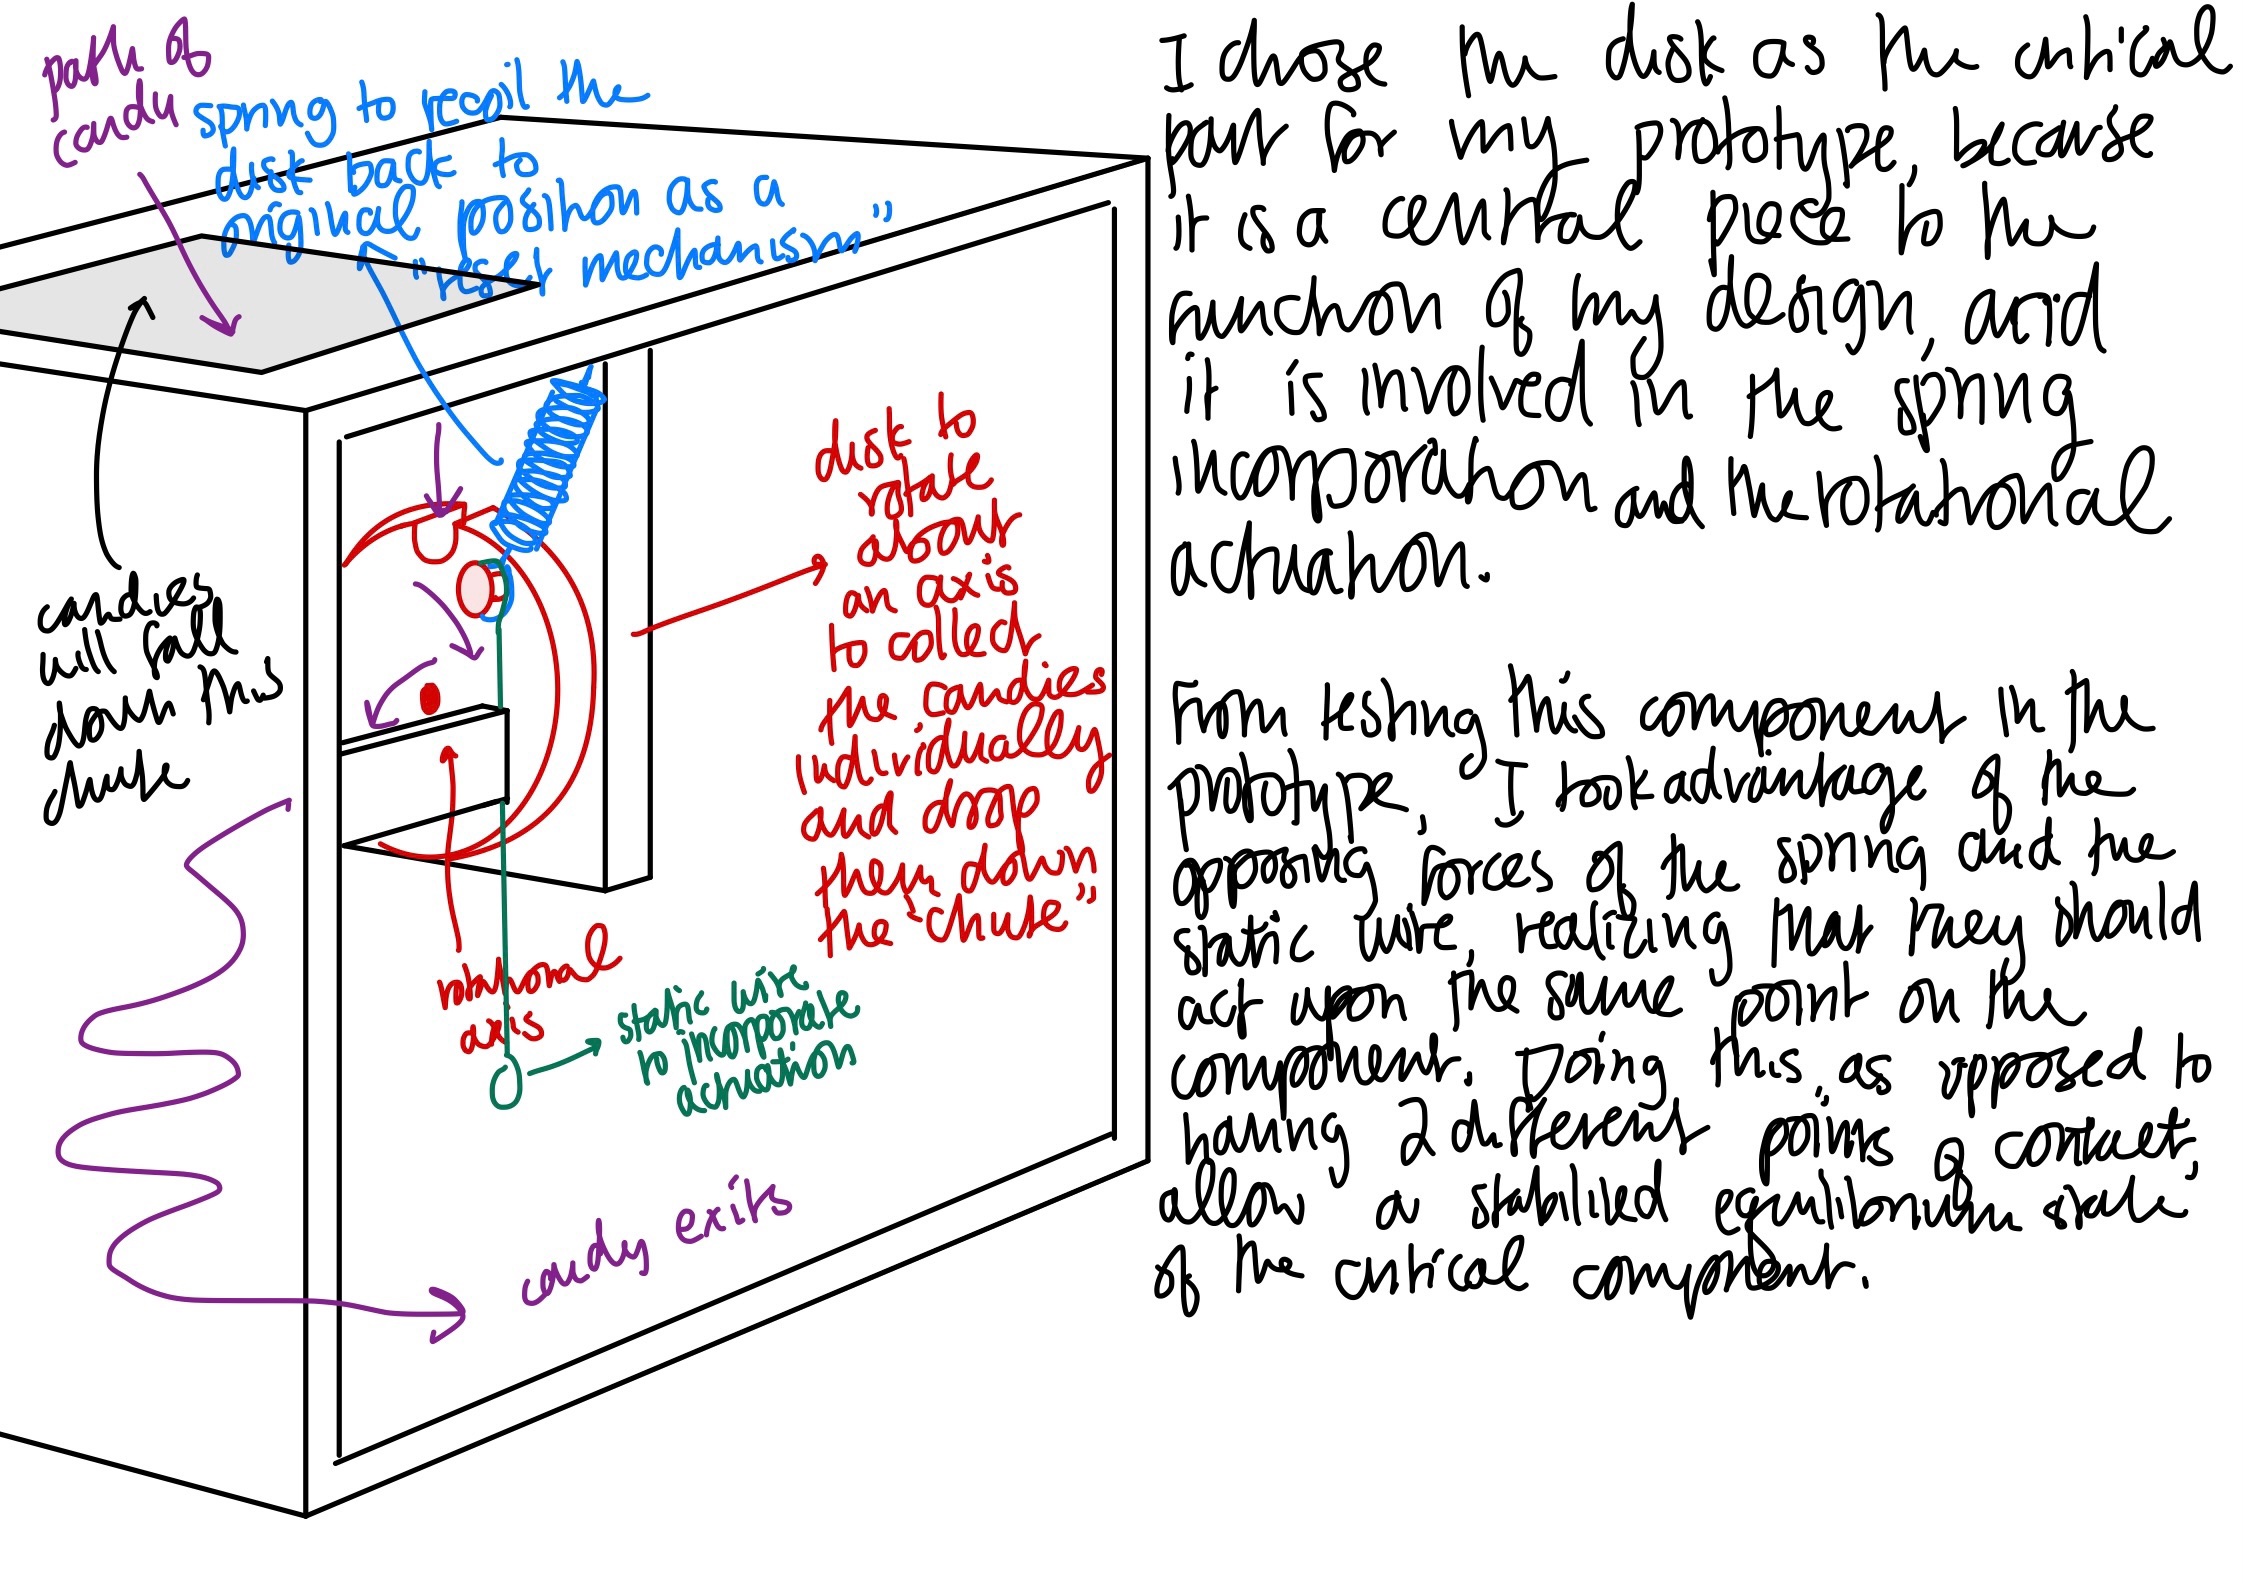
The essential components
- Top compartment to store the candies
- Disk that is connected to the lever via a spring so that when the lever is actuated, the disk will rotate and dispense the candy that is currently stored in the groove
- The disk is next to the compartment, and the candies will travel through an opening in the compartment into a groove in the disk
- Path for the candy to travel down until arriving at the compartment at the bottom of the dispenser
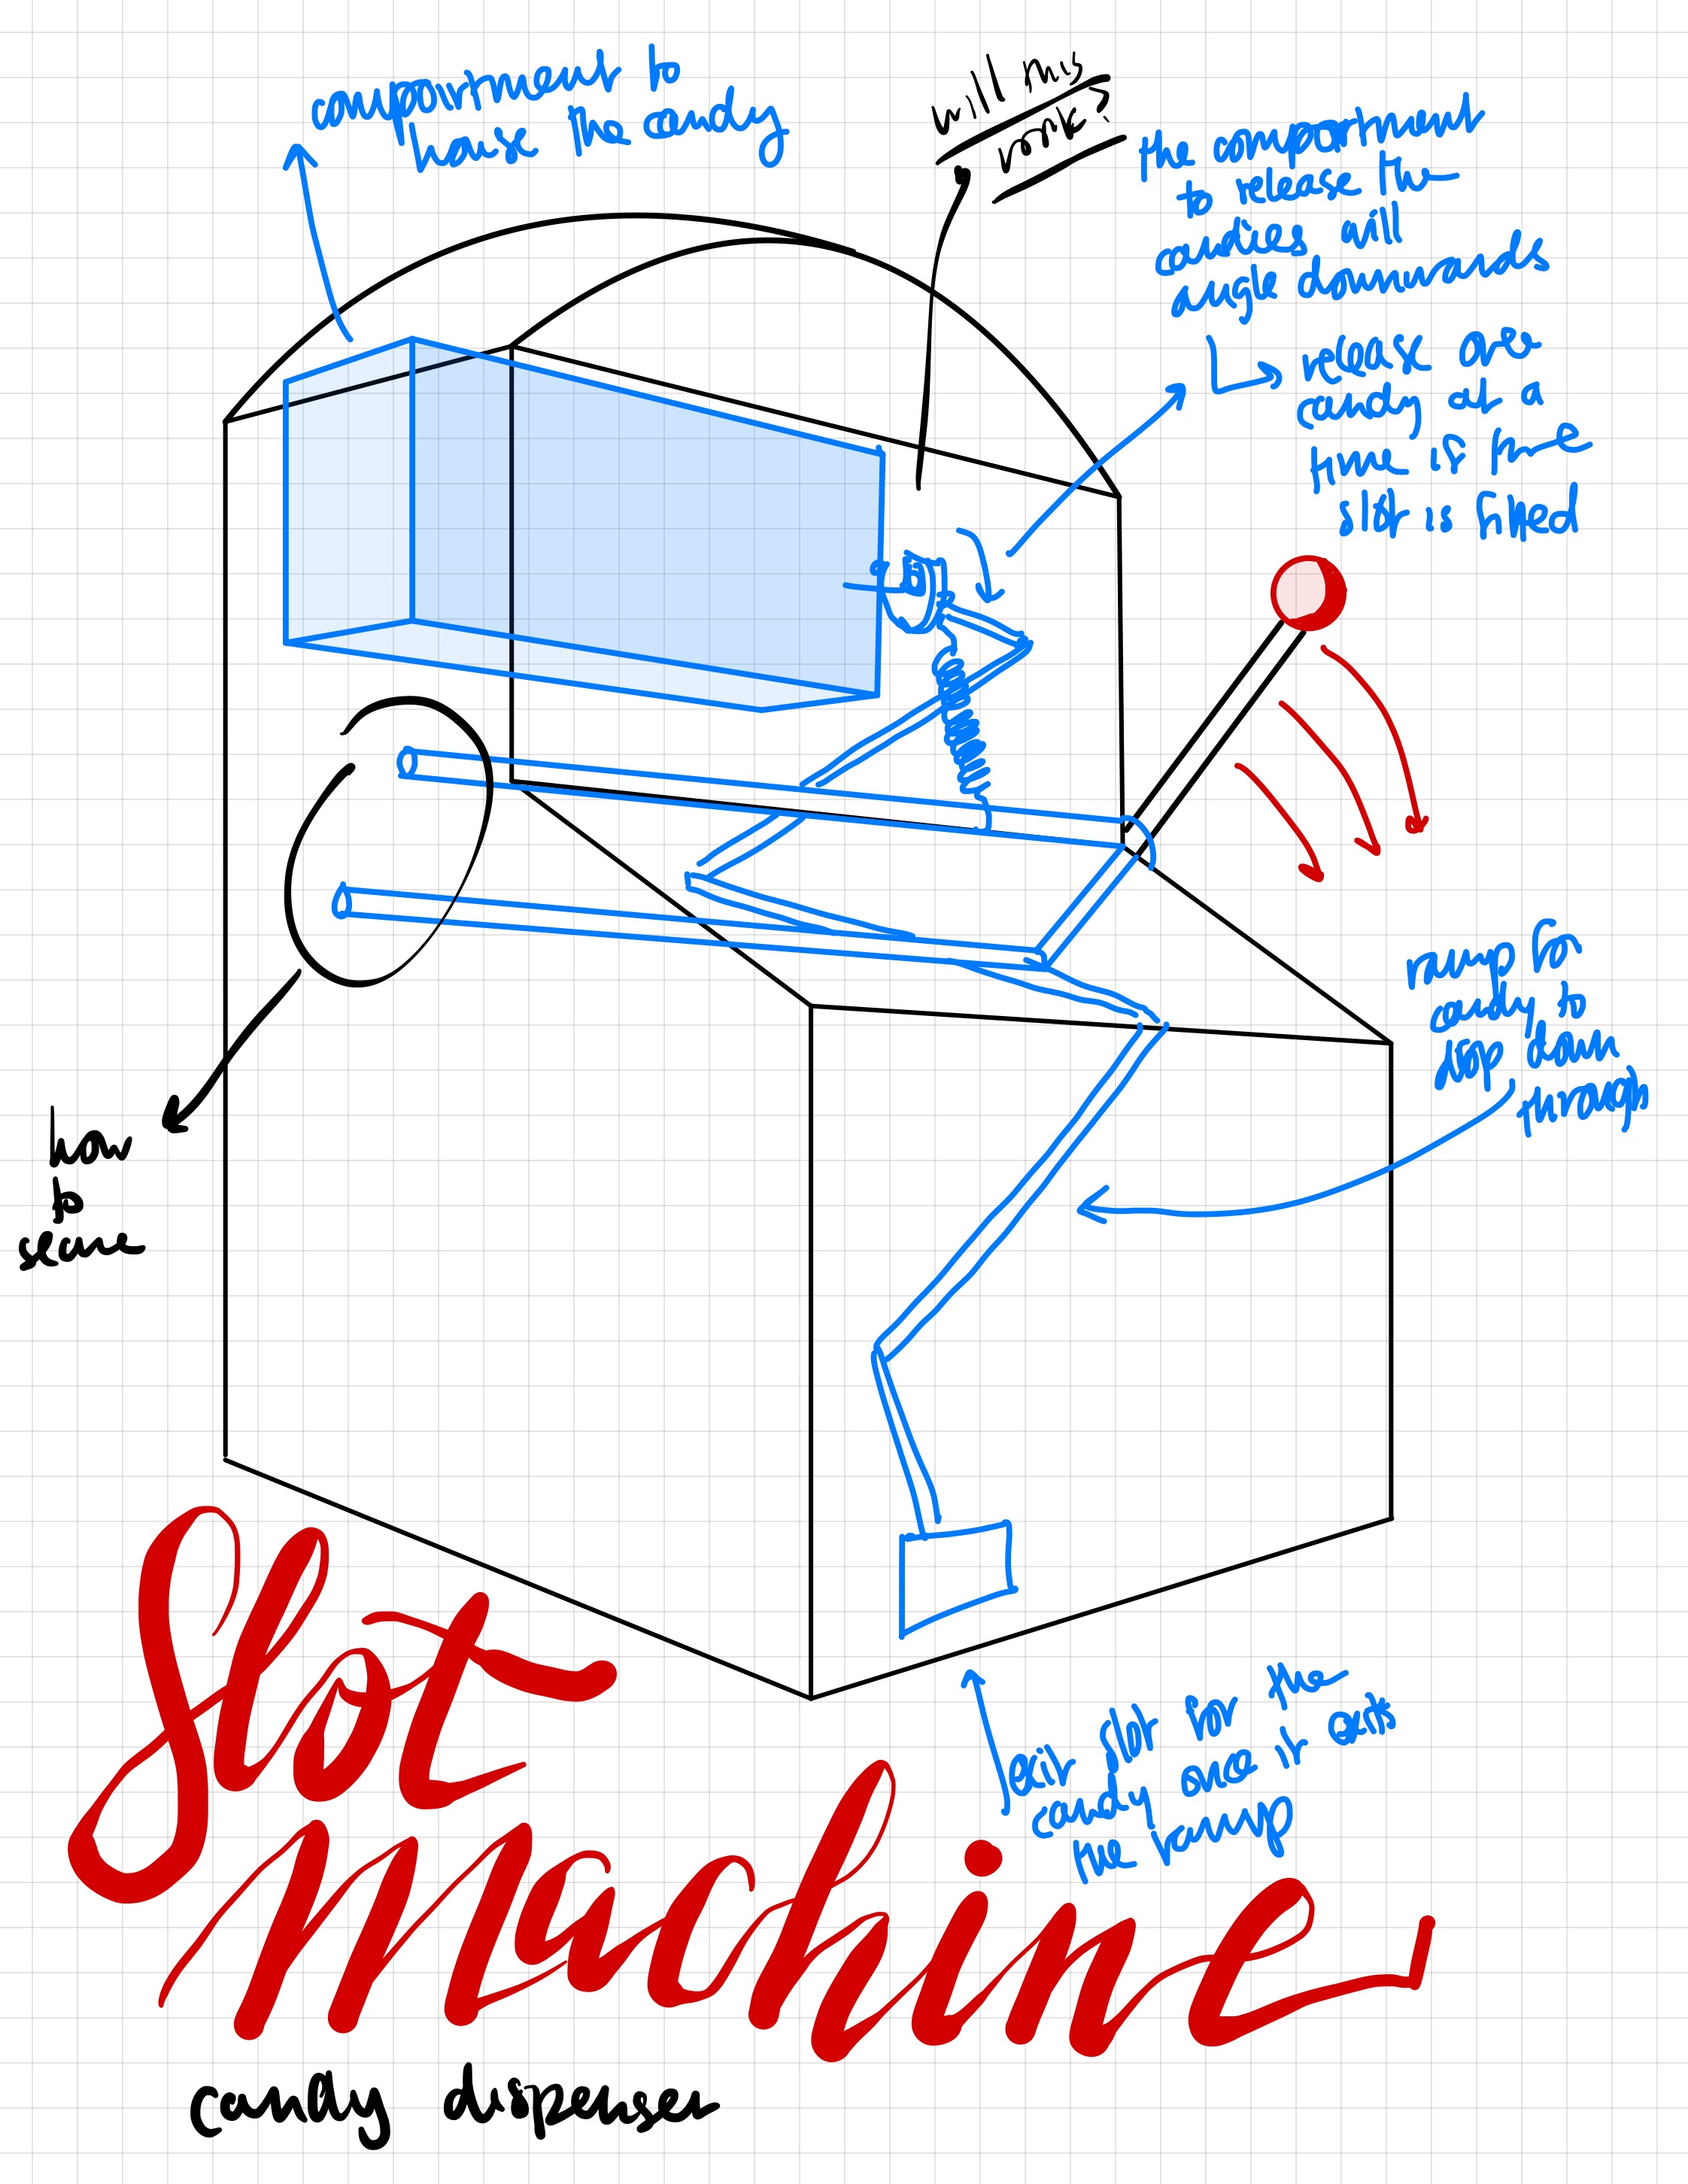
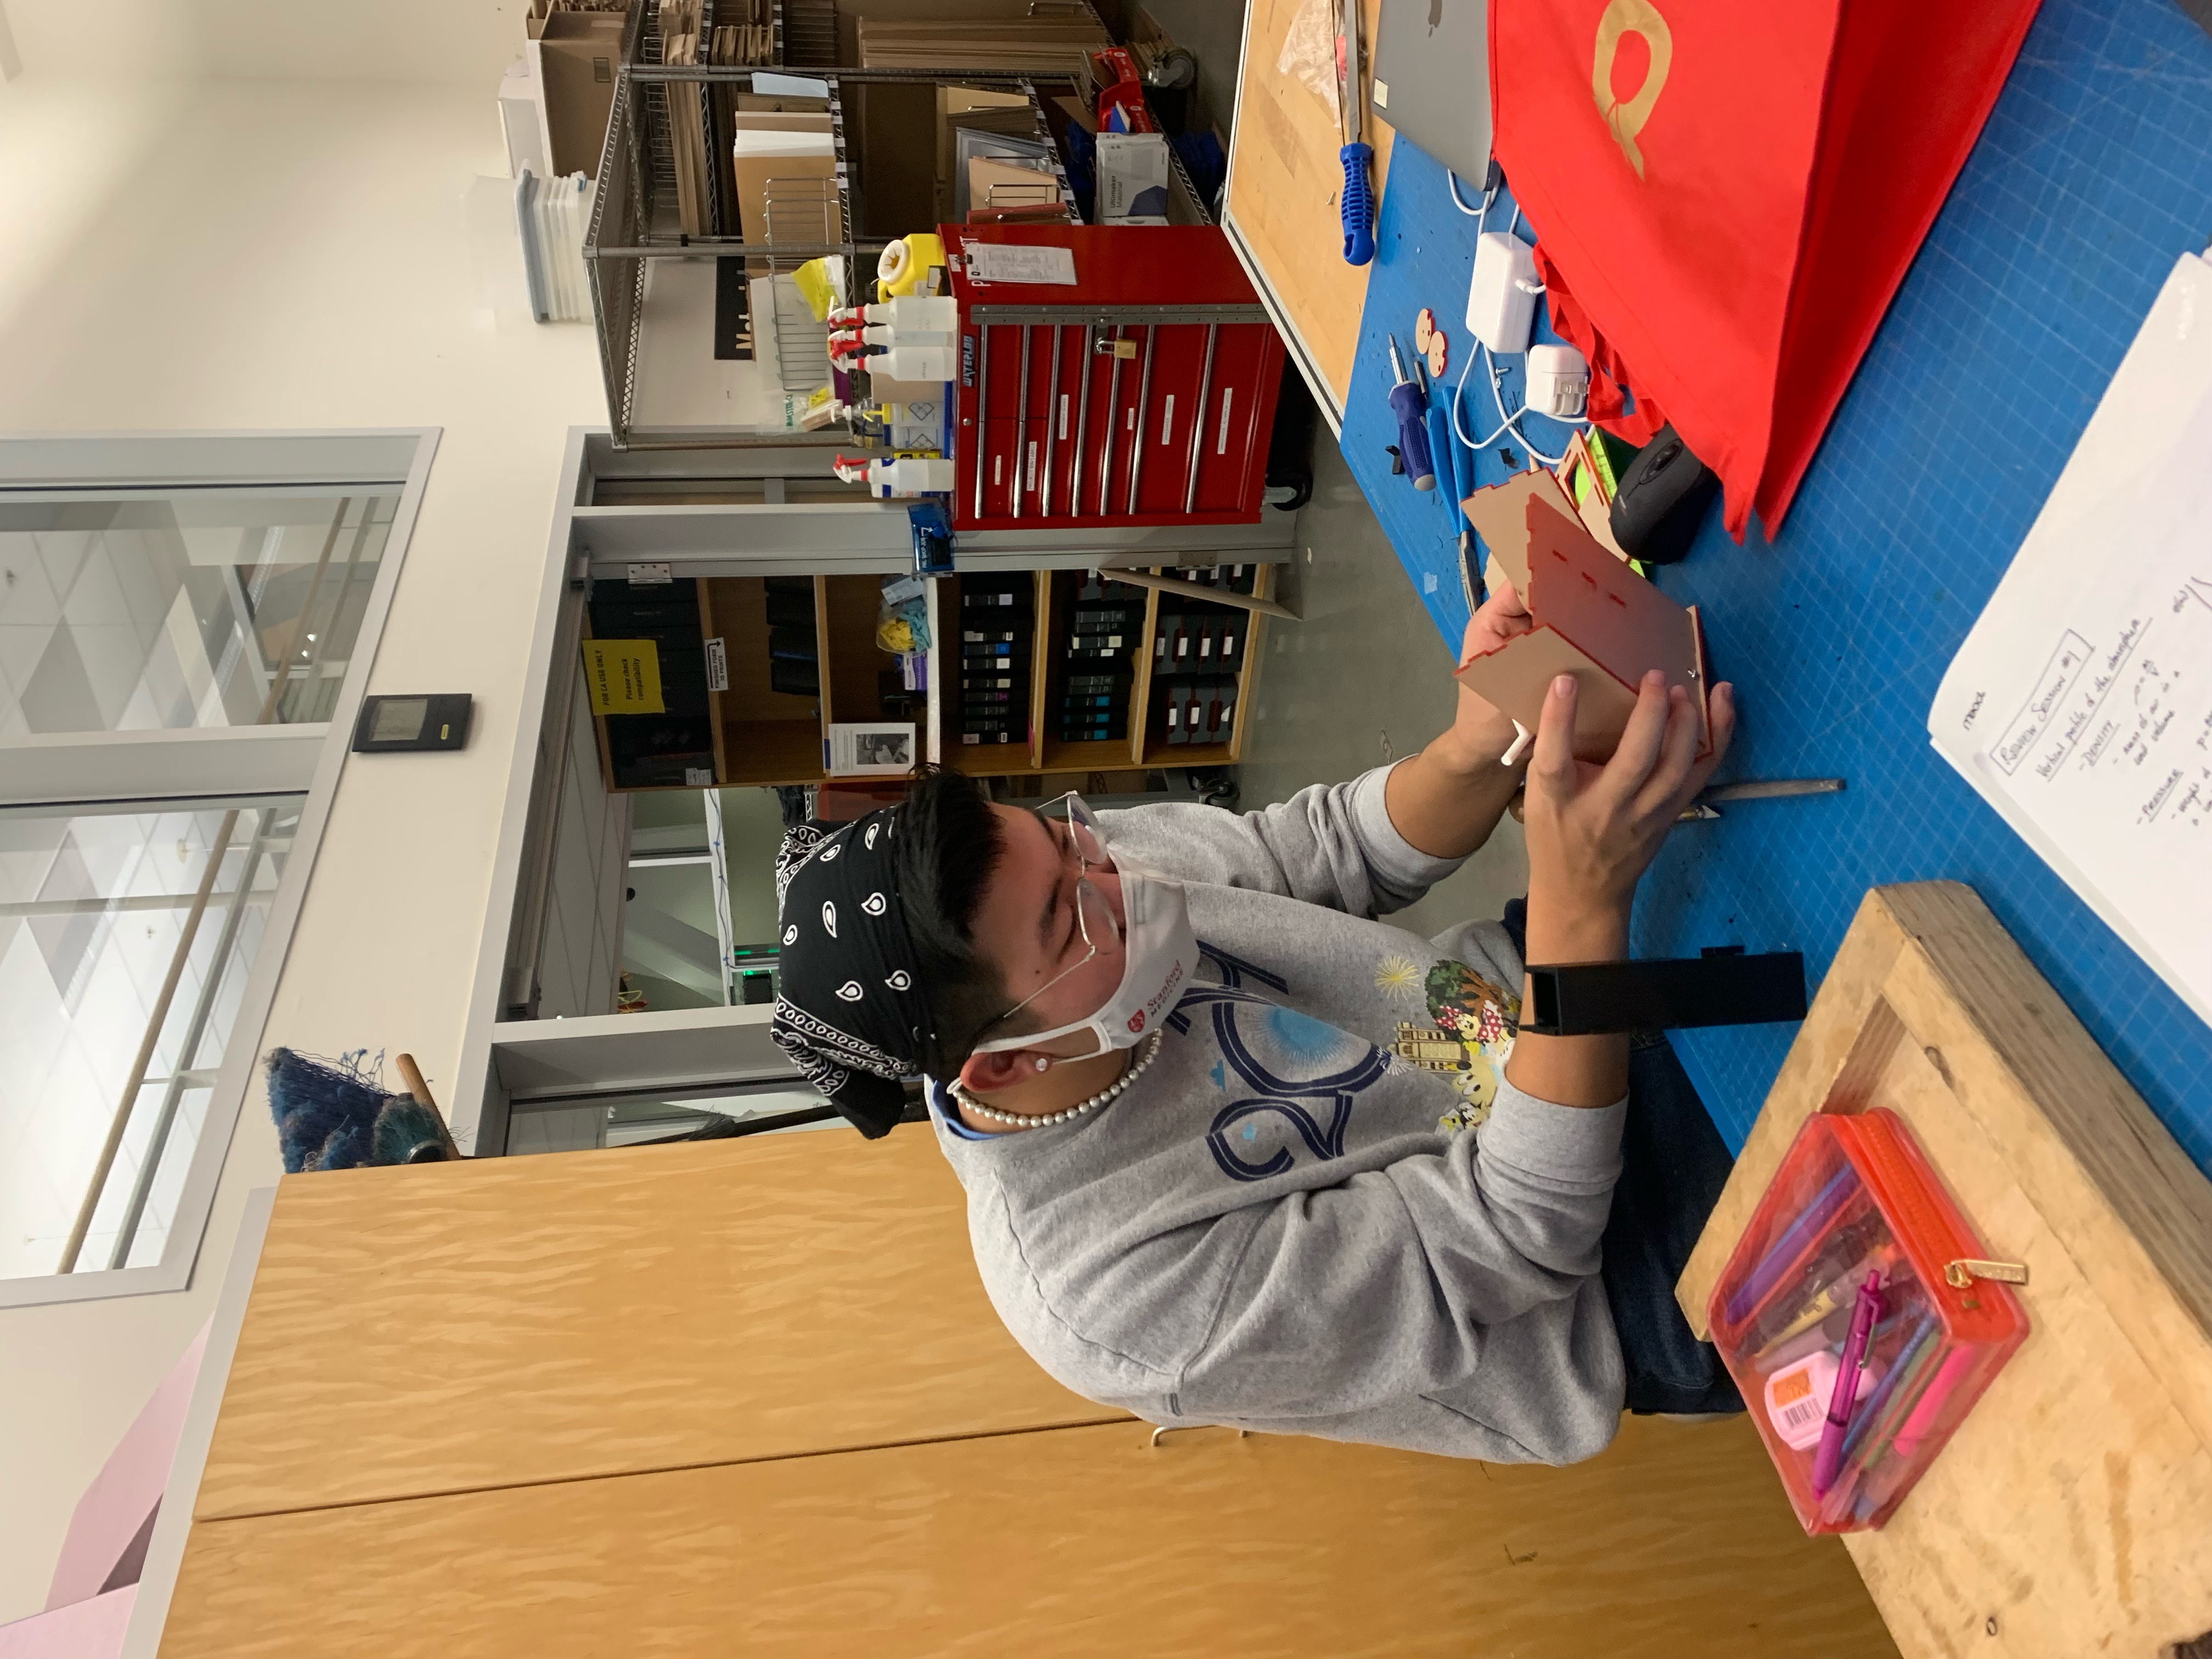
Rapid Prototyping
The disk next to the compartment made it difficult to dispense one candy at a time, as it didn’t have the desired funneling effect
The elastic connection between the disk and the lever made it so that pulling the lever had no real effect
Back to the Drawing Board
Following the less-than-stellar results of my rapid prototype, I decided to revisit the idea of how the interior mechanism of the candy dispenser would function:
- I wanted to create an opposition of forces with the spring and the static wire that connects the disk to the lever
- The wire would rotate the disk down to dispense the candy to the path, and the spring would automatically reset the disk to collect the next piece of candy ready
- With this new design, only one candy would dispense at a time, as the next candy would rest atop the disk and cannot fall until the groove opens up
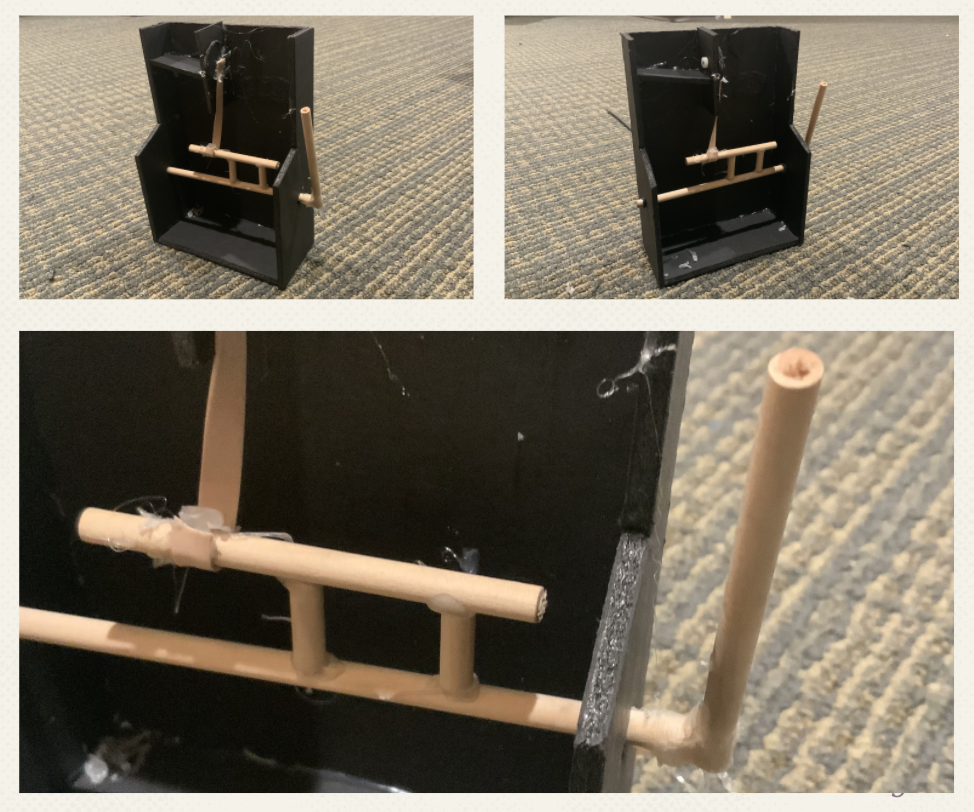
Functional Prototype
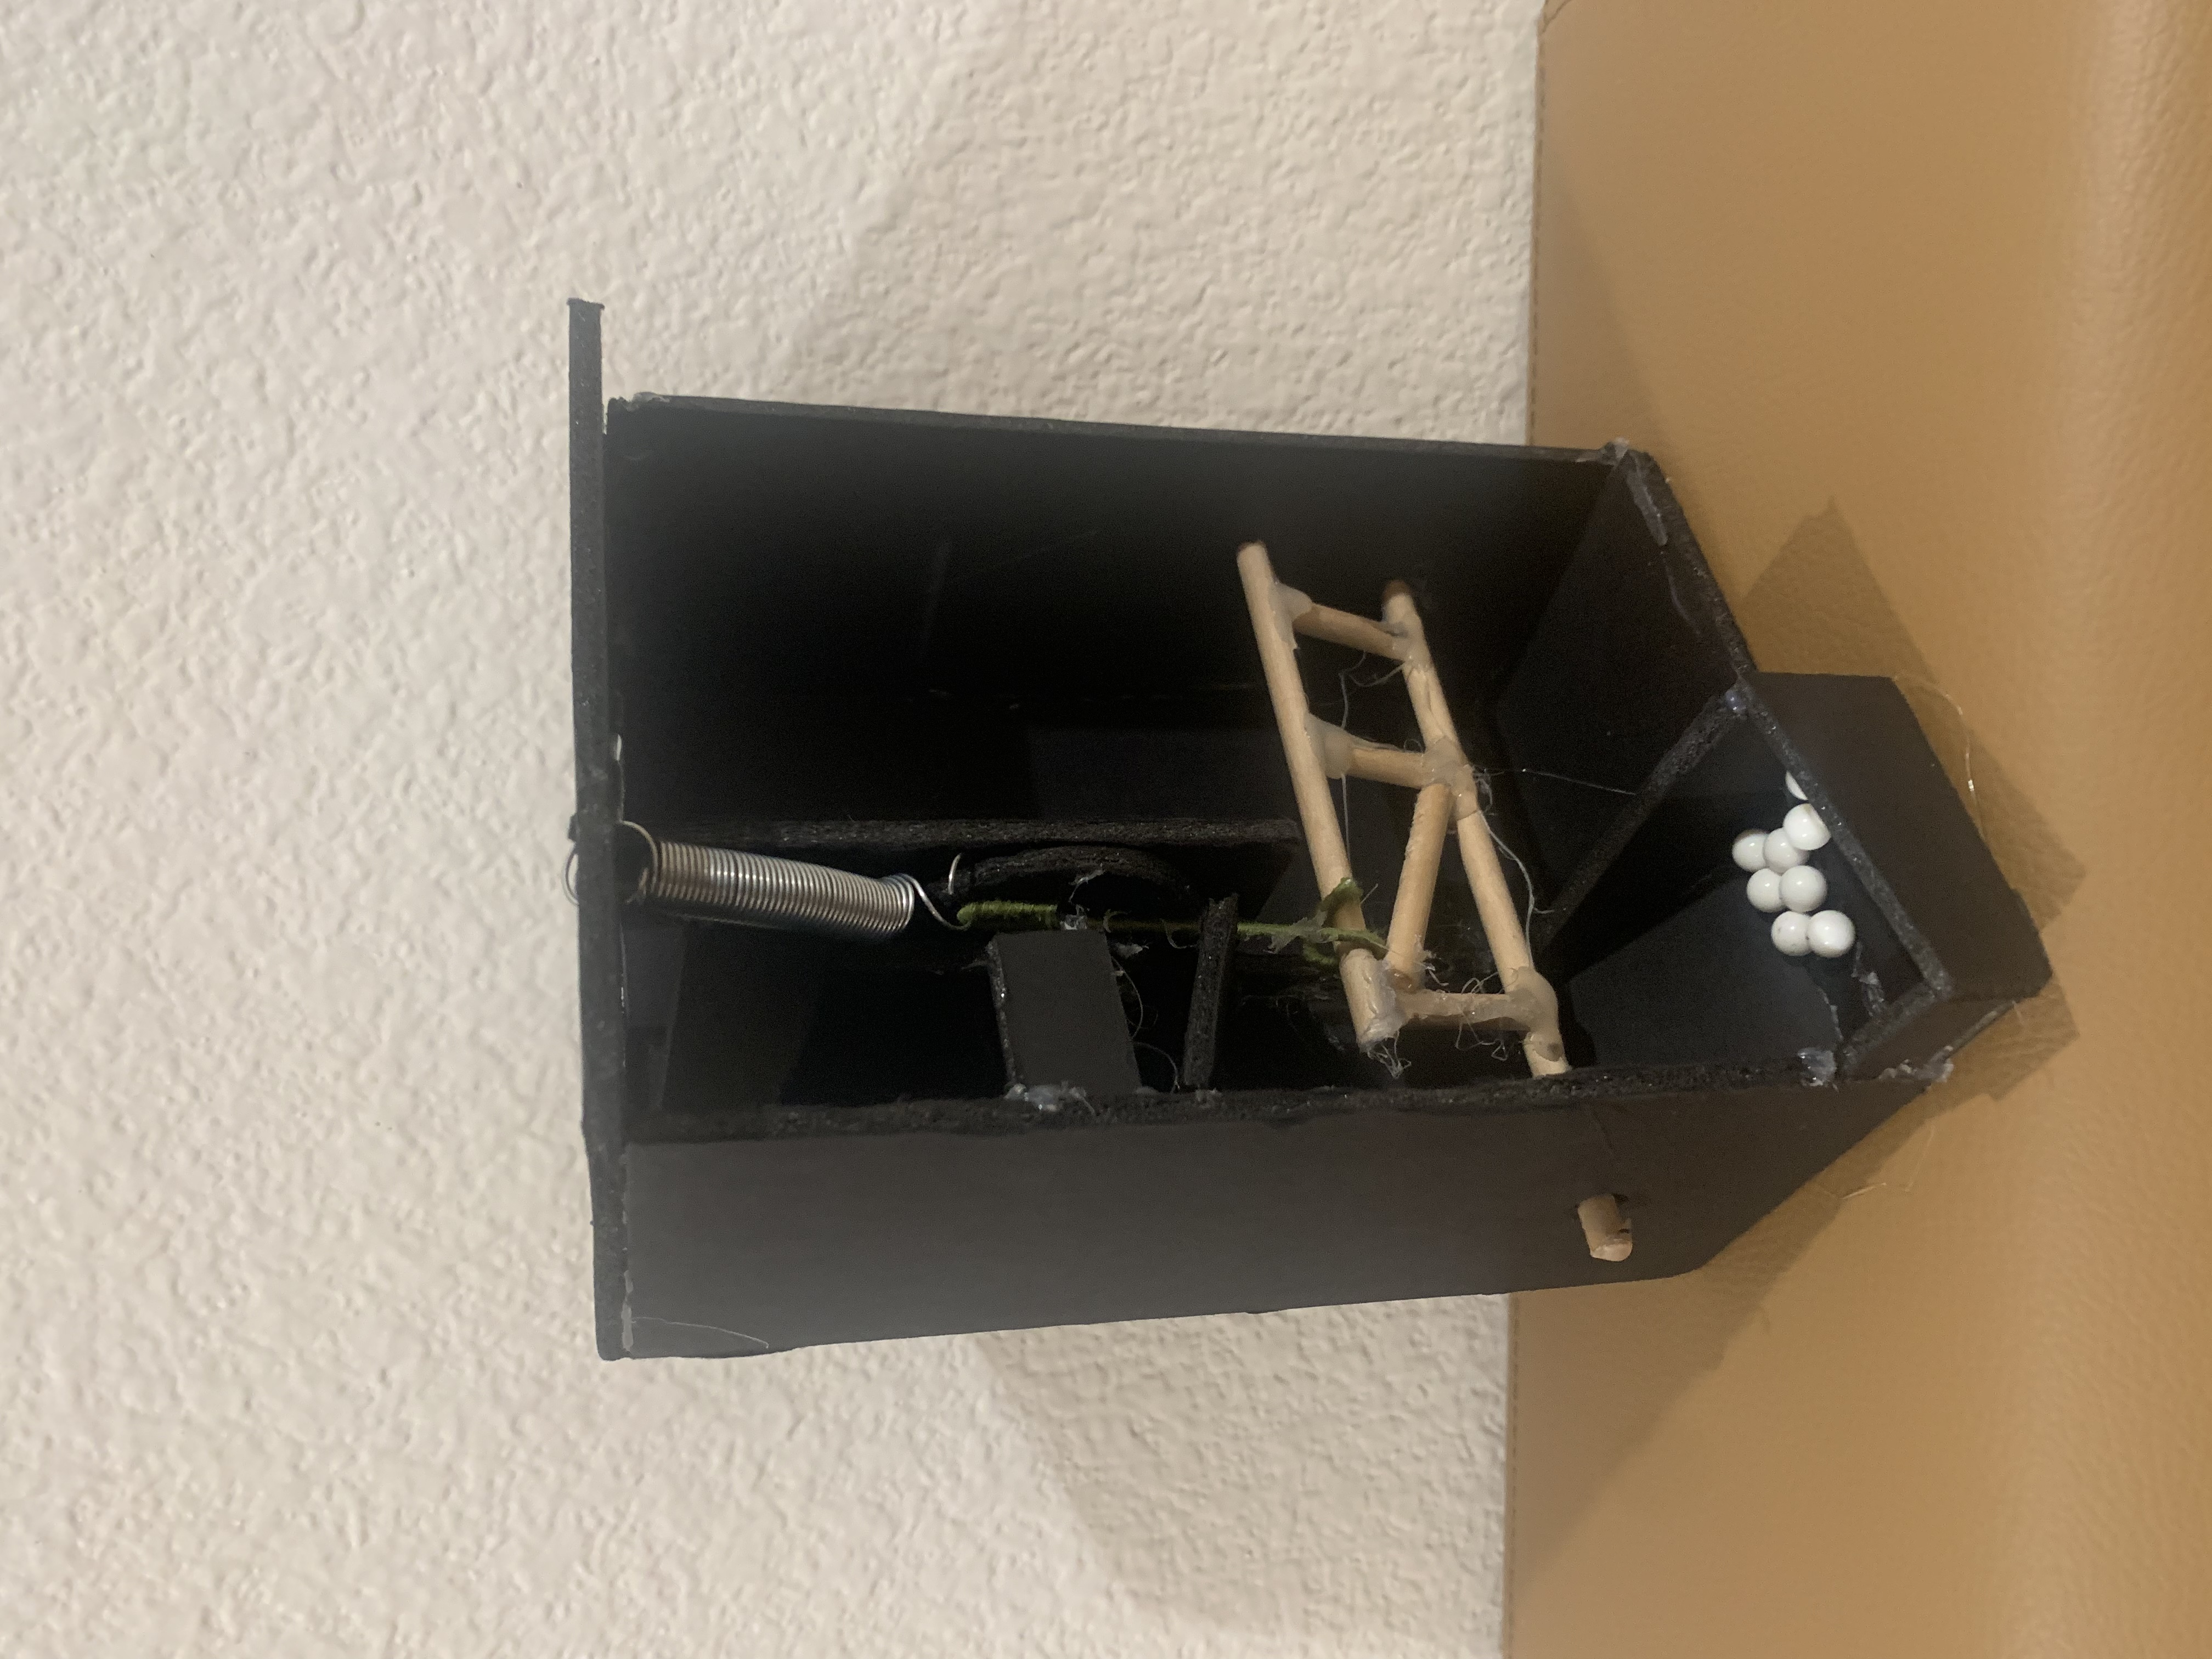
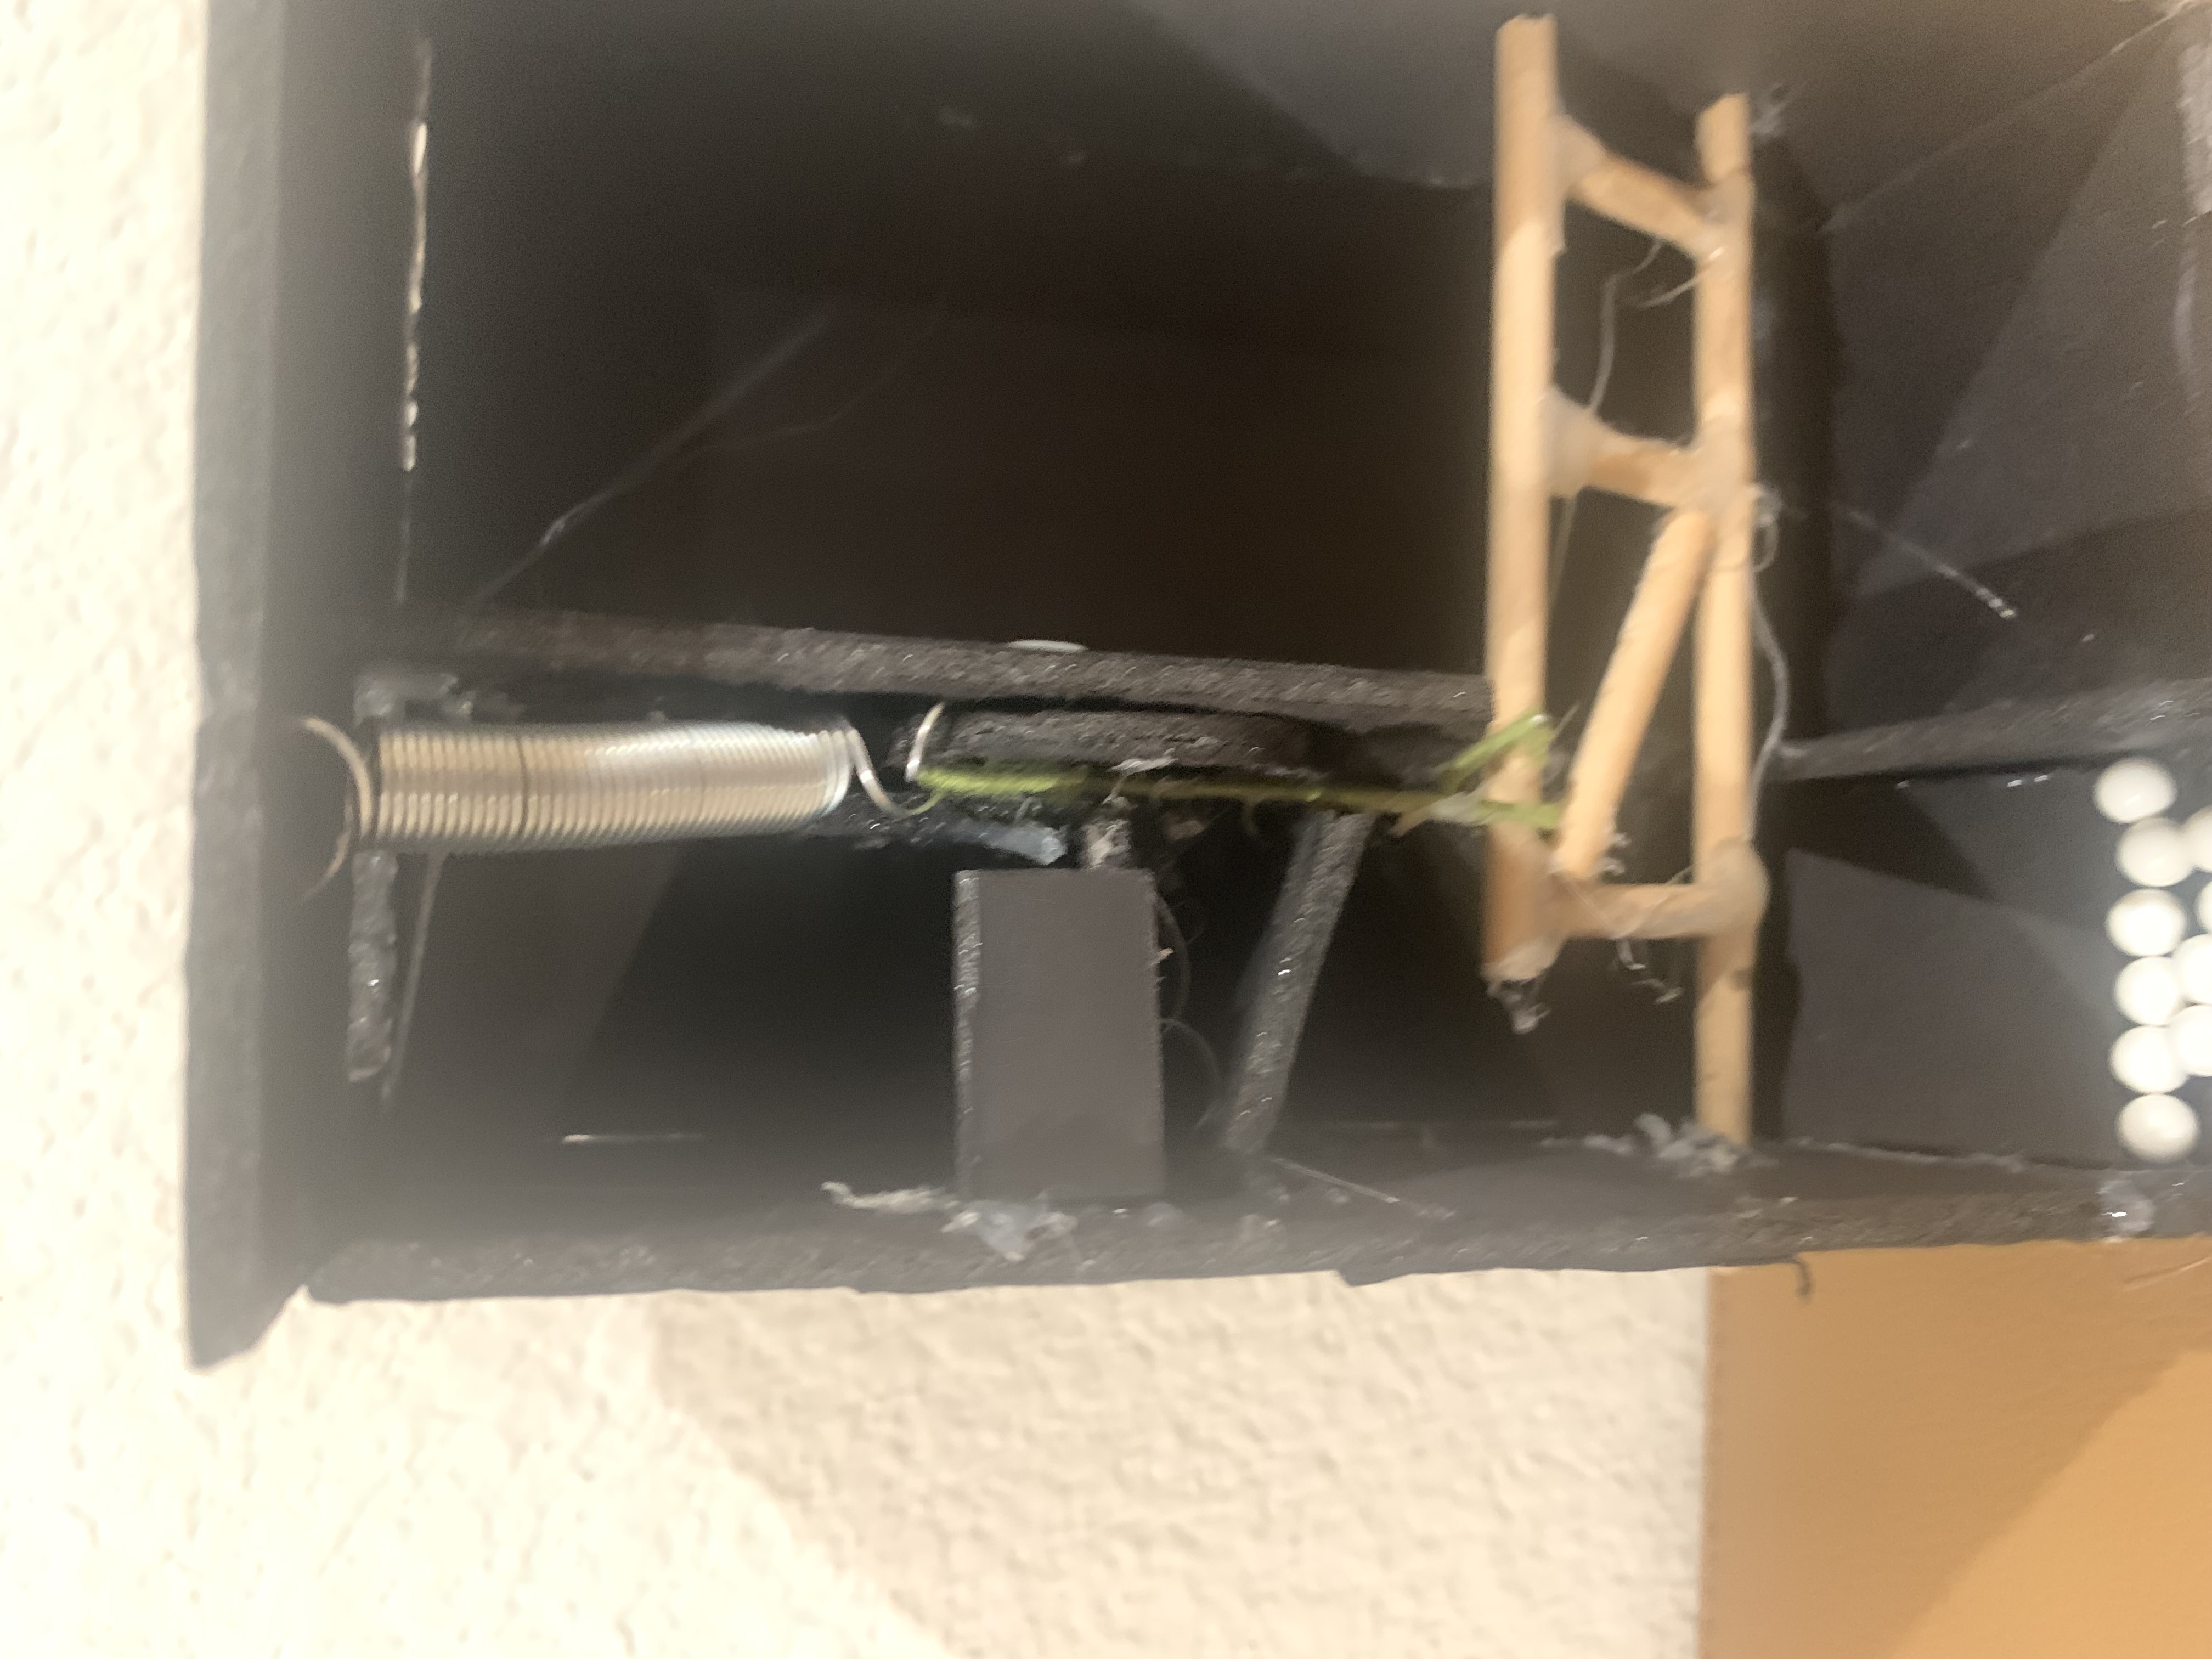
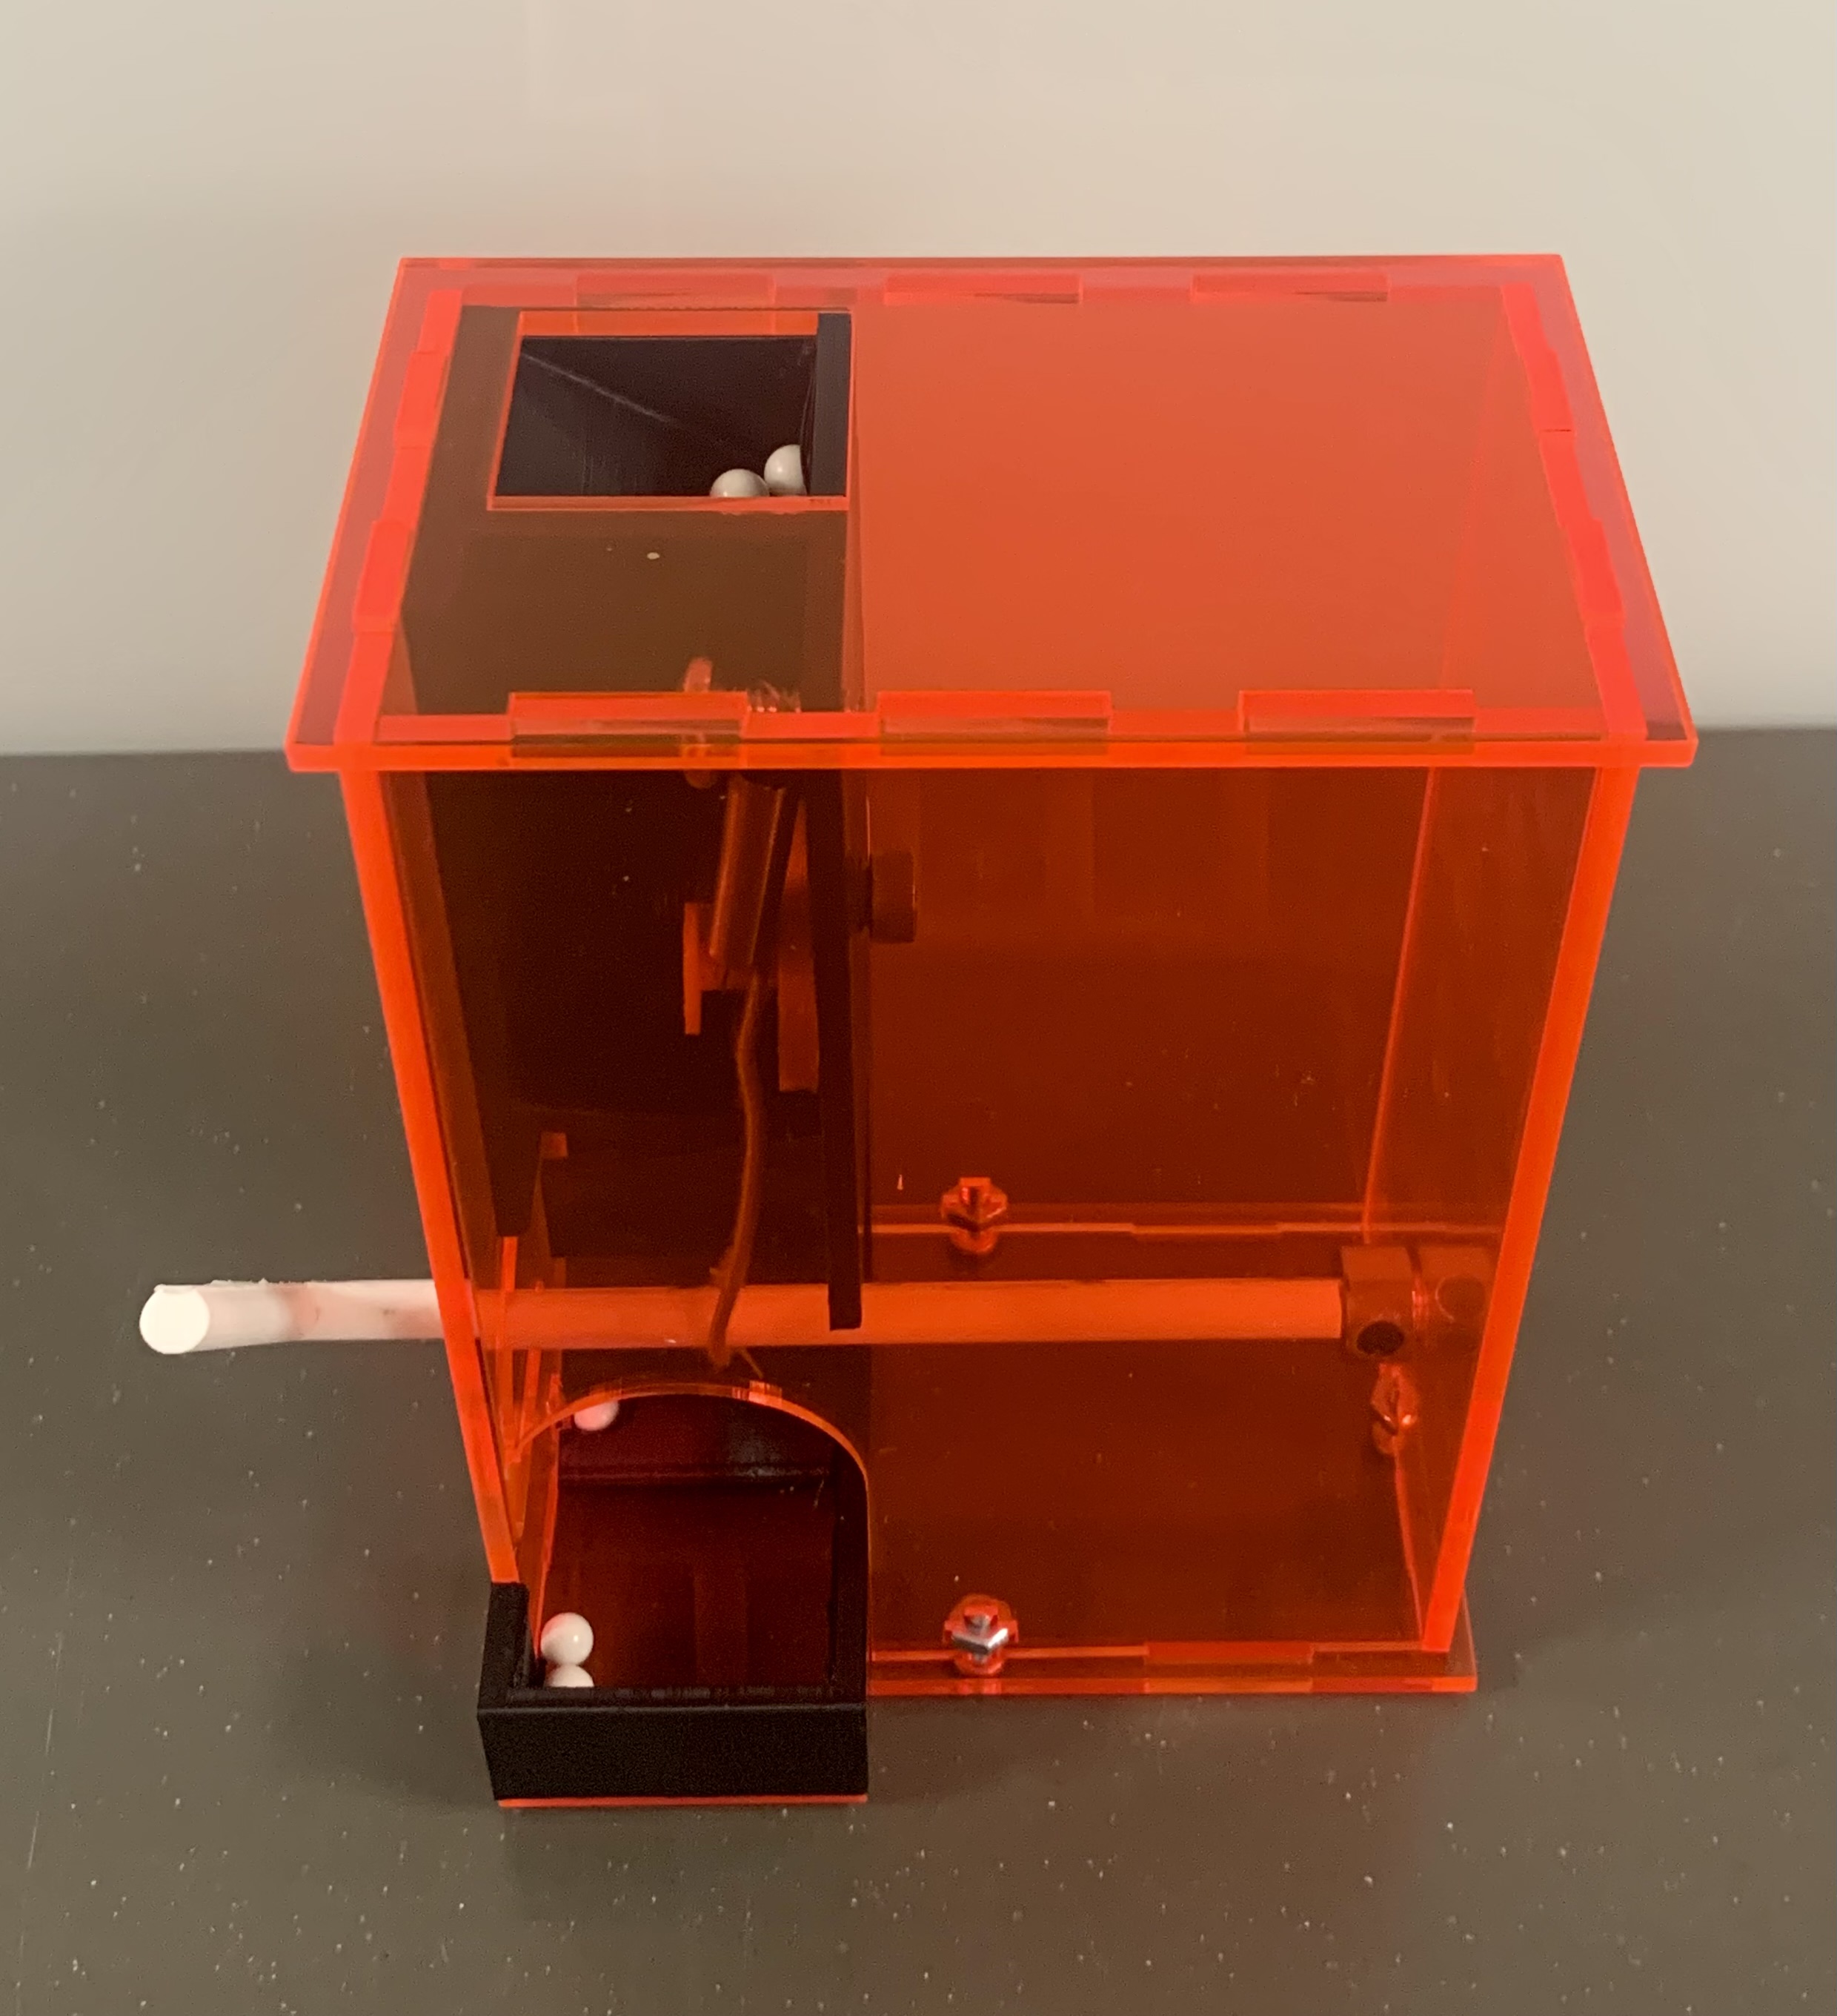
I started the prototype from scratch, applying the changes from my rapid prototype. I fixed the disk underneath the container to hold the candies, used the spring to reset the disk and a static connection to join the disk and the lever.
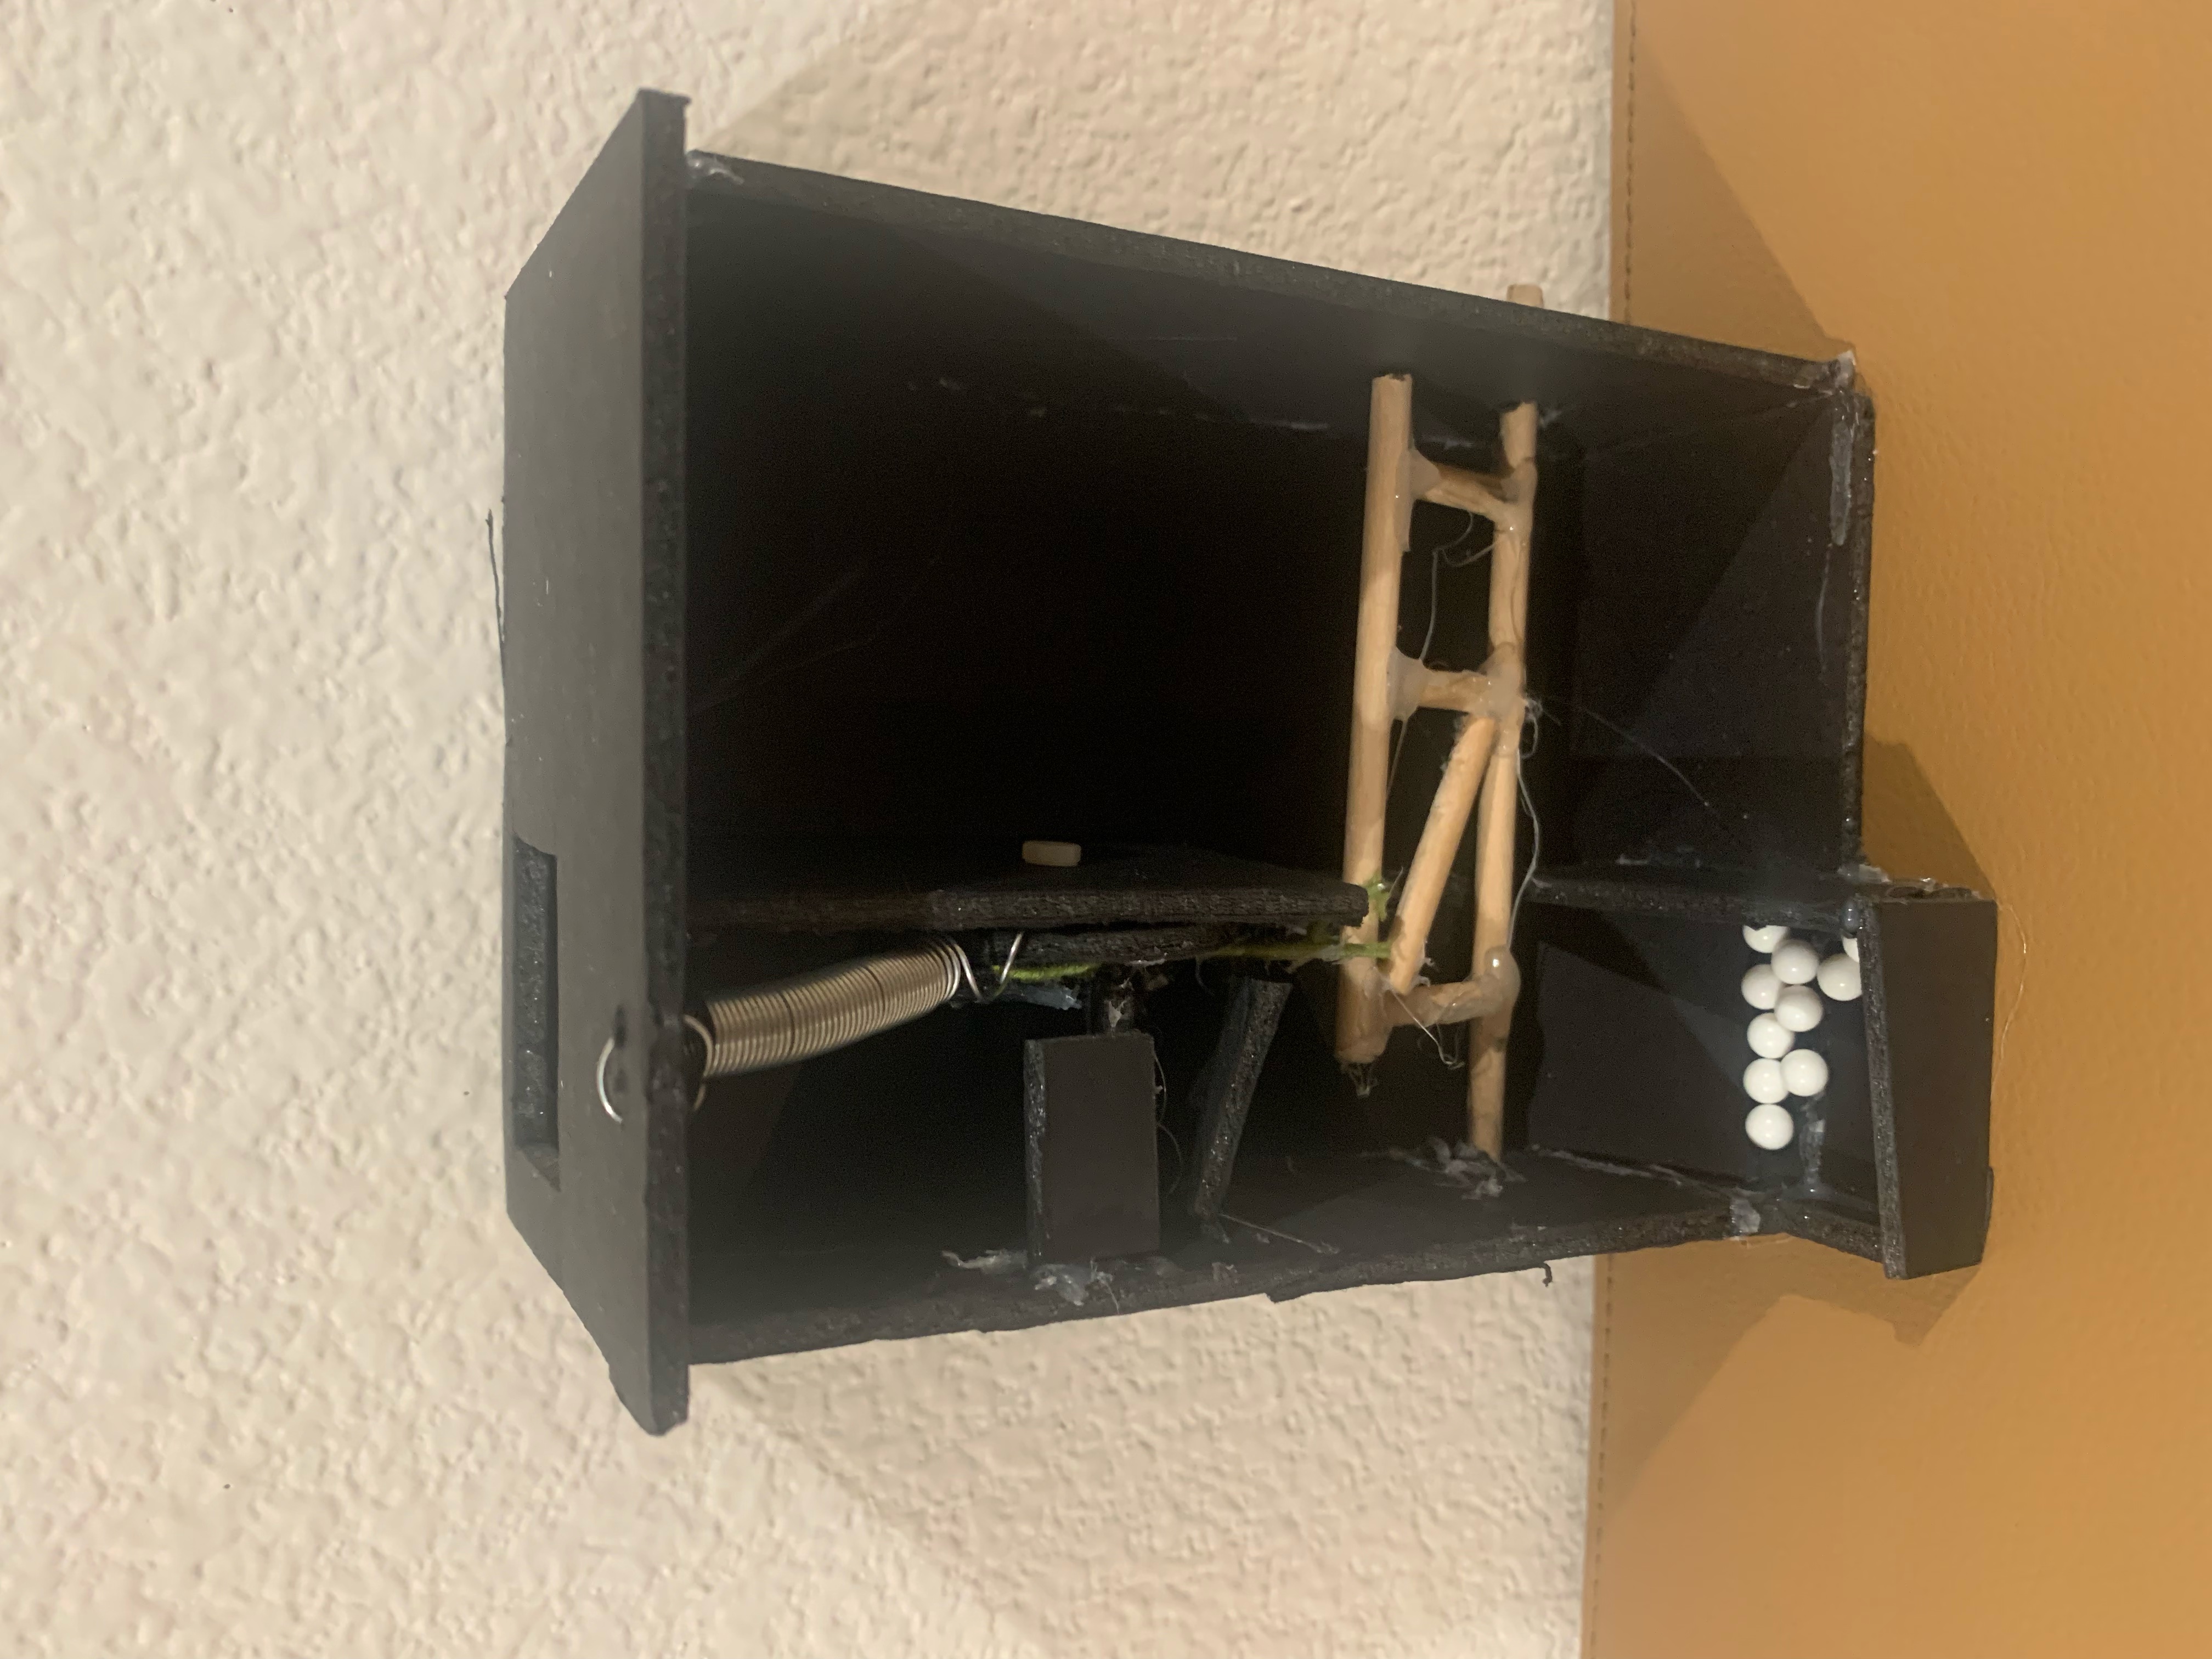
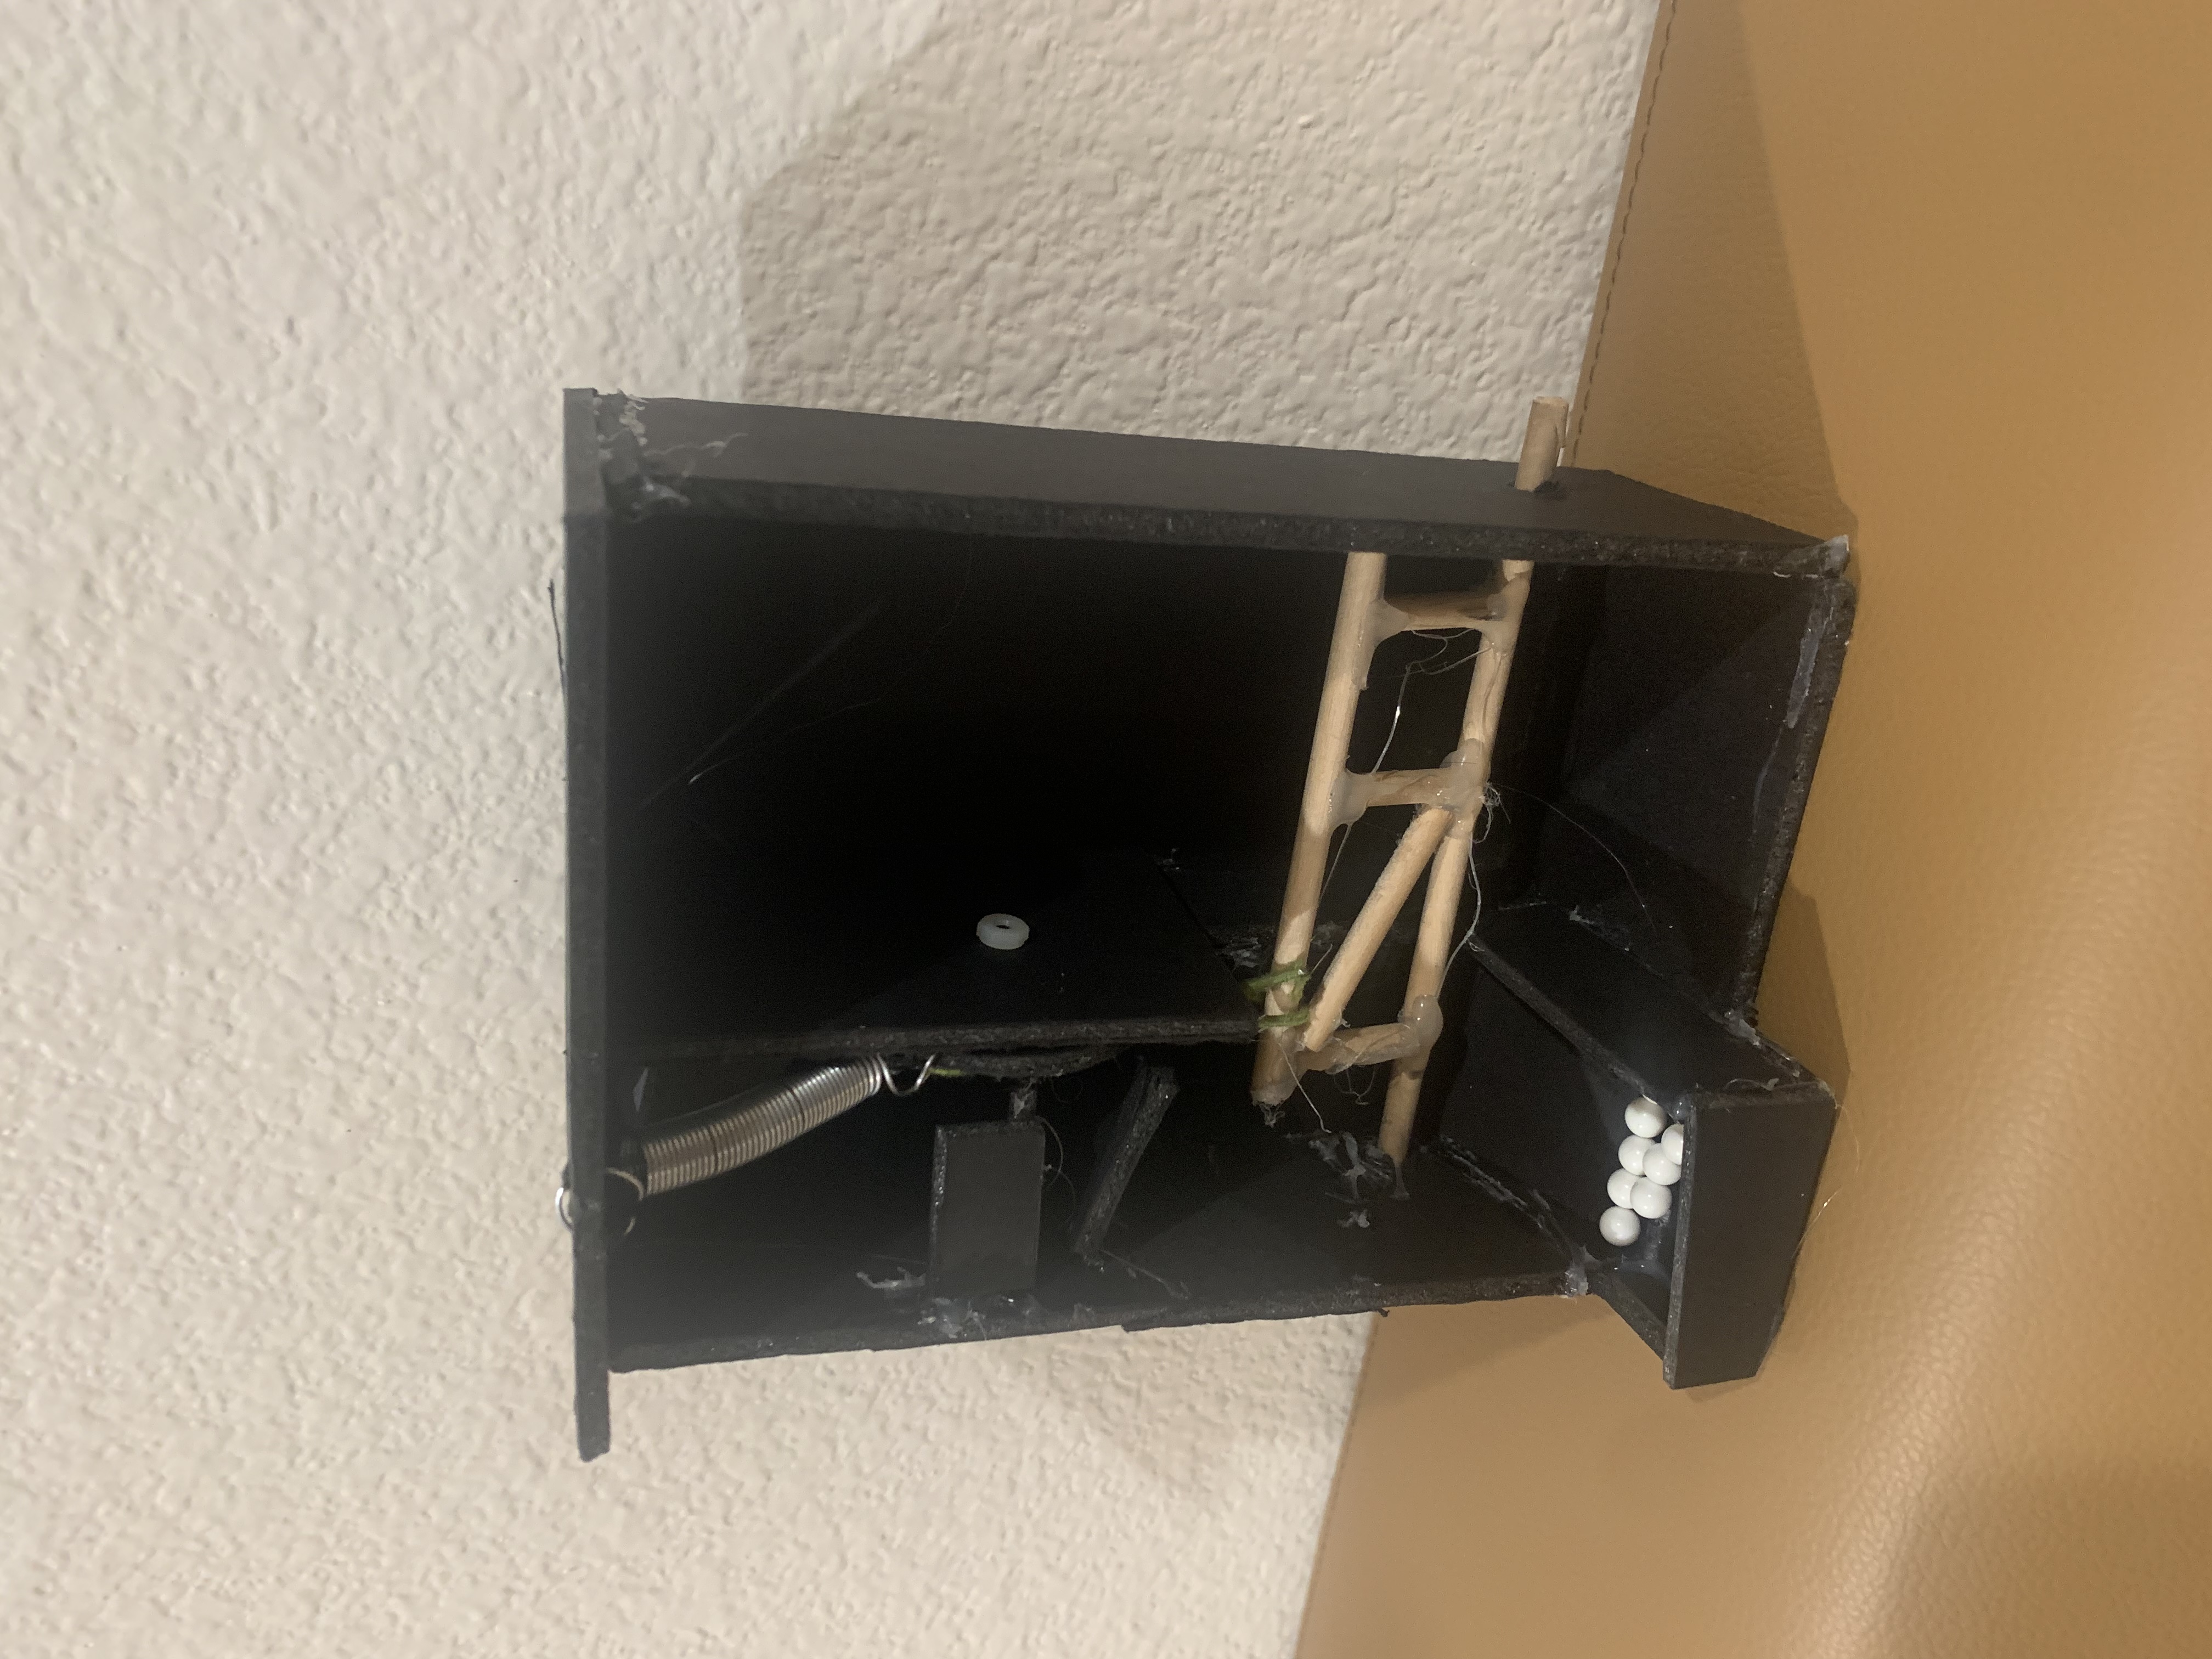
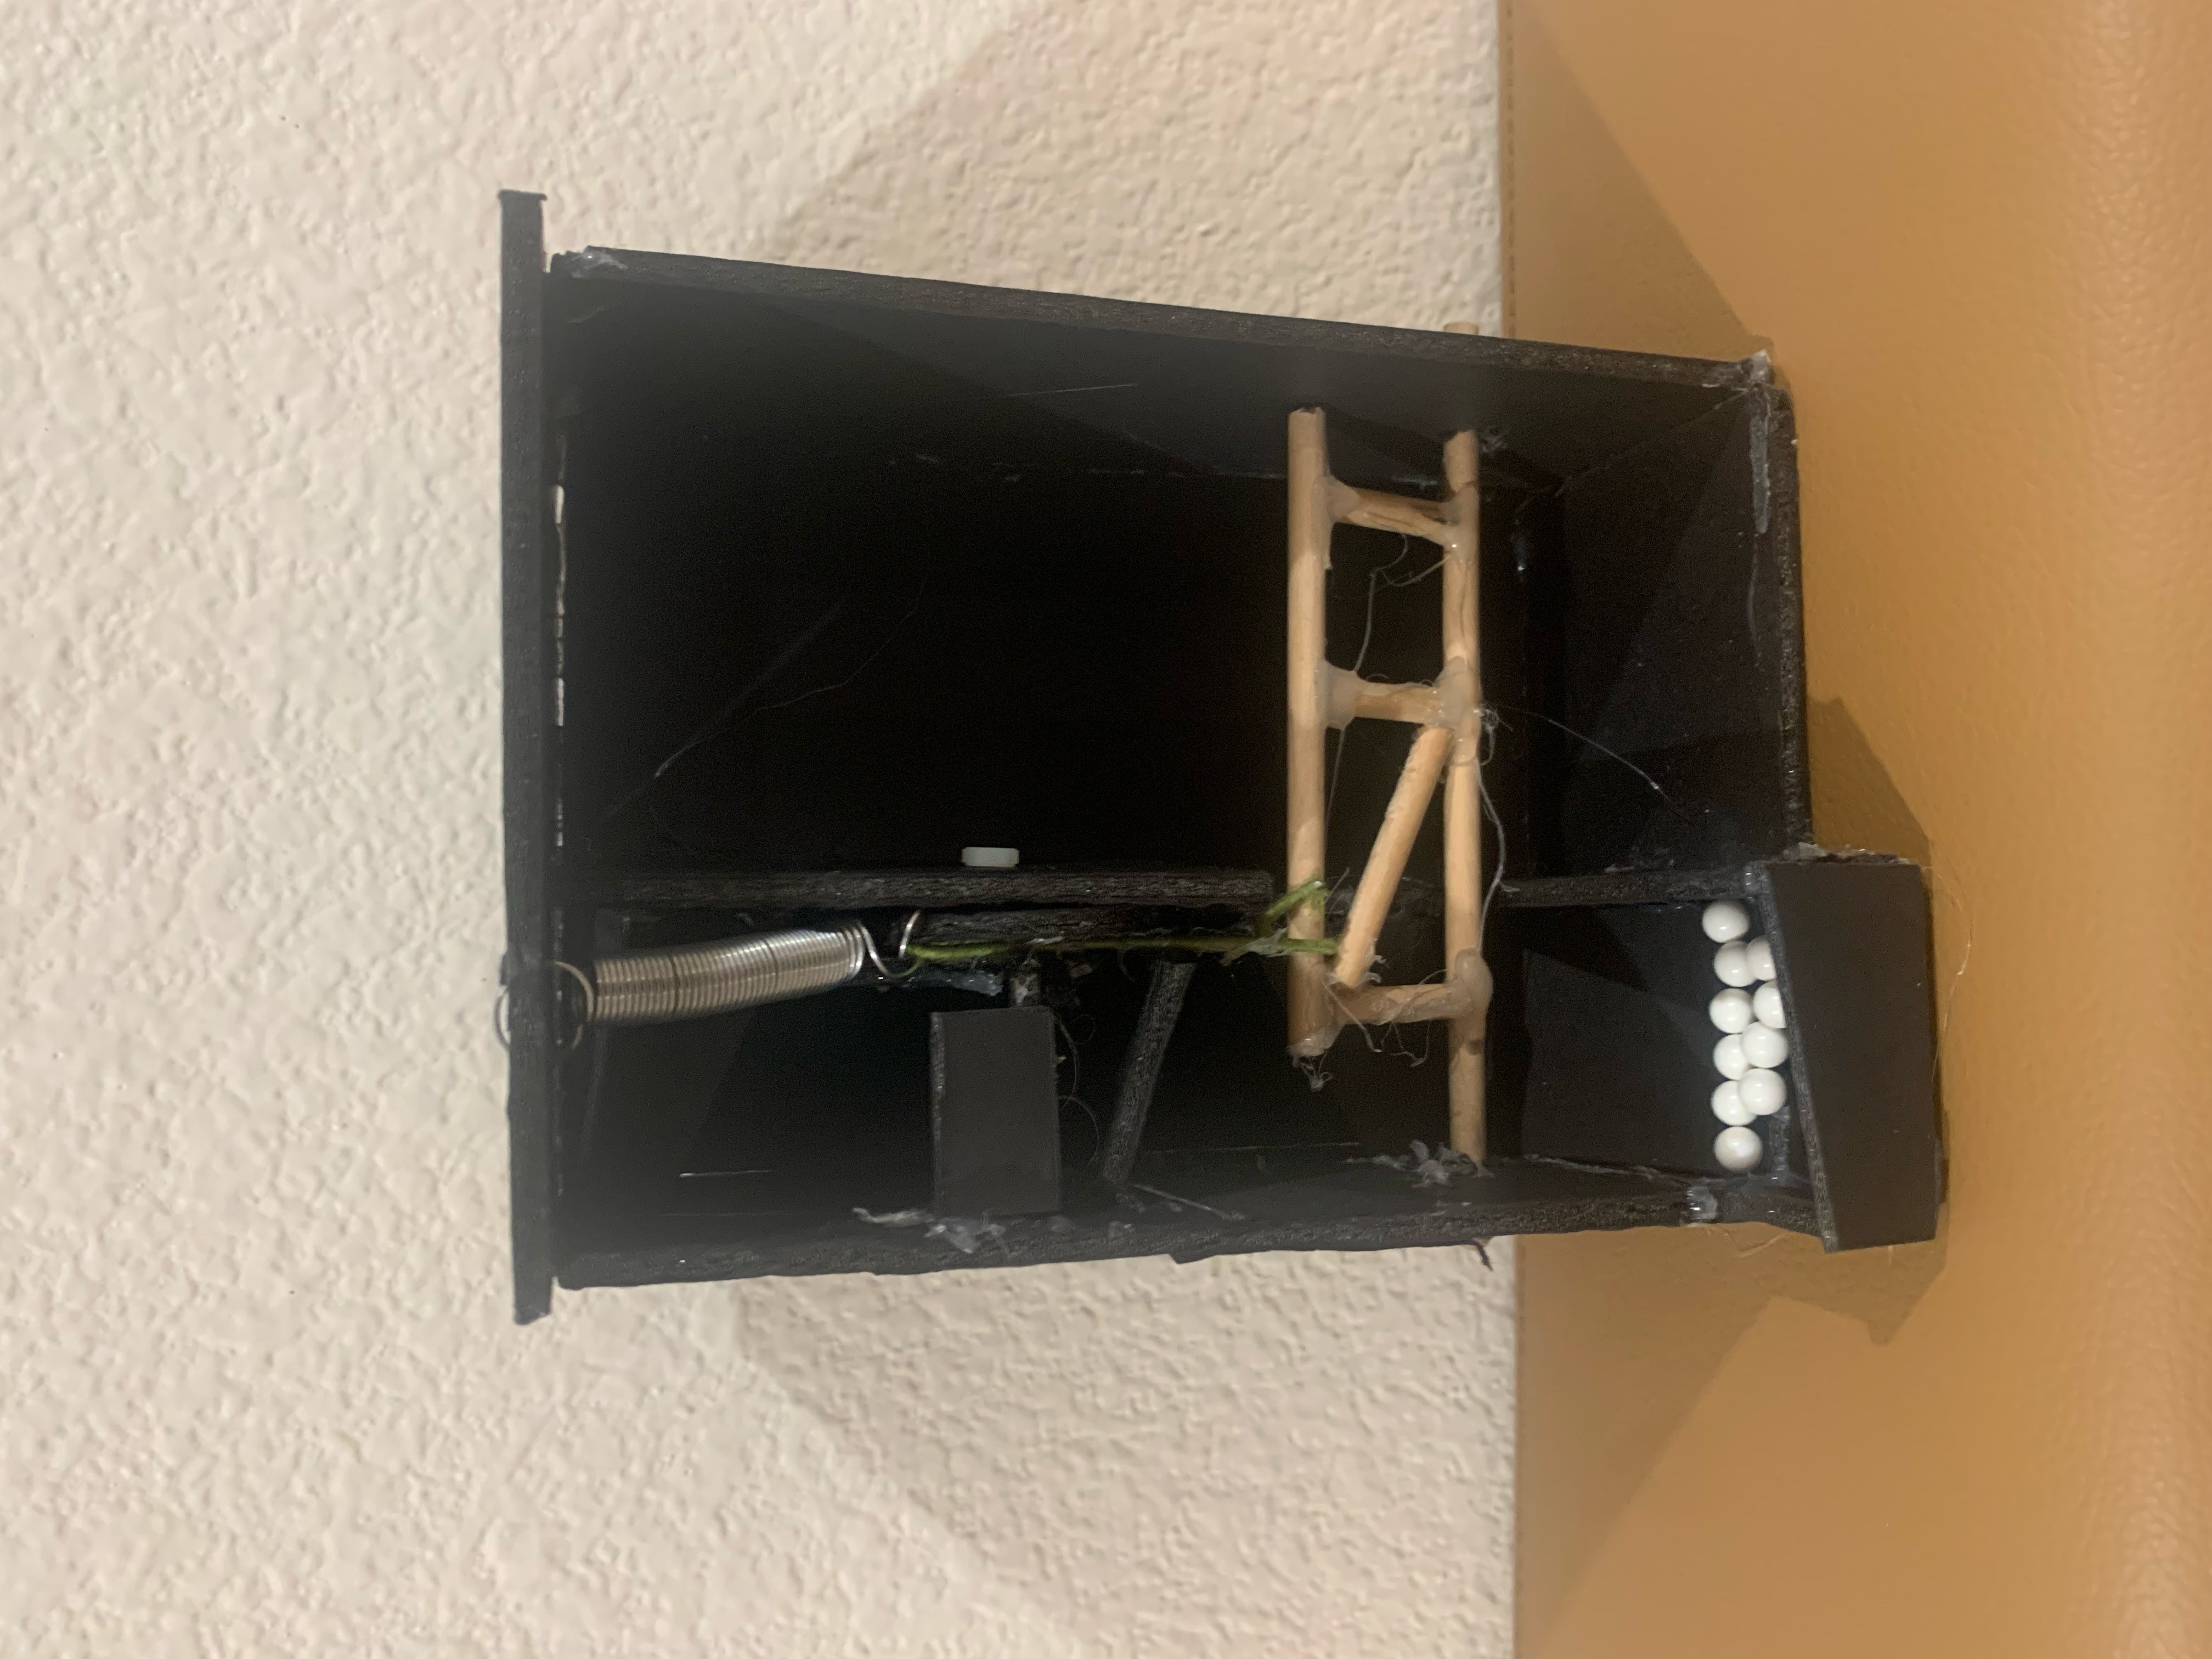
Strengths
- Placing the disk underneath the “funnel” definitely let the candies more efficiently and accurately fall into the groove of the disk
- The prototype is fully functional and even resembles a general idea of the final product
- Dispenser not only functions but fulfills the requirements of the assignment
Weaknesses
- The input lever would be too weak to actuate from outside of the dispenser, needs to be activated from inside
- The Spring was the wrong expansion spring and I had mounted the spring weirdly (it had led to some bending in the spring)
I was determined to improve my prototype in the following ways:
- In order to strengthen my lever, I could create an arced slot for the lever to extend the lever base across the width of the dispenser (and initiate a hard-stop for the preload)
- I could fix my spring mounting issue by mounting the spring on a dowel pin on the model (instead of “threading” it through the walls of the dispenser
Digital and Physical Modeling
3D Print
I wanted to 3D print my interior mechanisms and my lever, as those would be elements of my dispenser that would require 3-dimensional extrusion and cuts
Laser-Cut
I wanted to laser-cut the walls of my box, as this would be more time-efficient and the box faces could just be cut and assembled. I laser-cut into ⅛” thick acrylic plastic
Hardware
I used the following hardware:
- Spring
- Shoulder Screw
- Machine Screws
- Hex Nuts
- Steel Collar

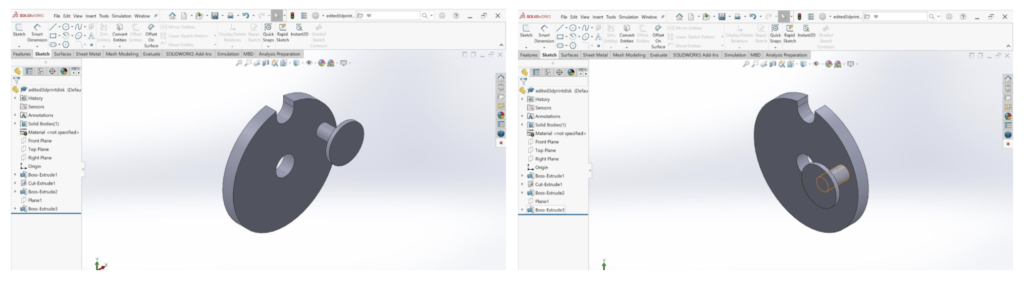
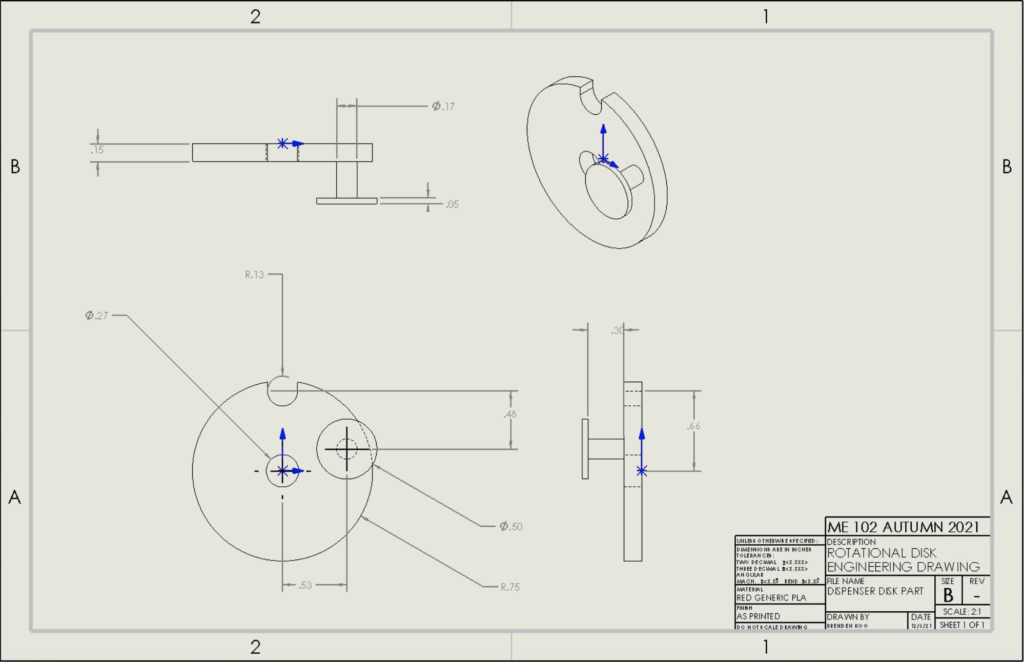
Critical Part – Rotating Disk
I initially intended to laser-cut this piece, with a hole to press-fit a 10-32 machine screw (instead of the extruded knob as pictured) but decided to change the design to be 3D printed upon realizing that using a machine screw would require a hex nut to secure in place, and the back of disk needed to be flush to the interior mechanism surface.

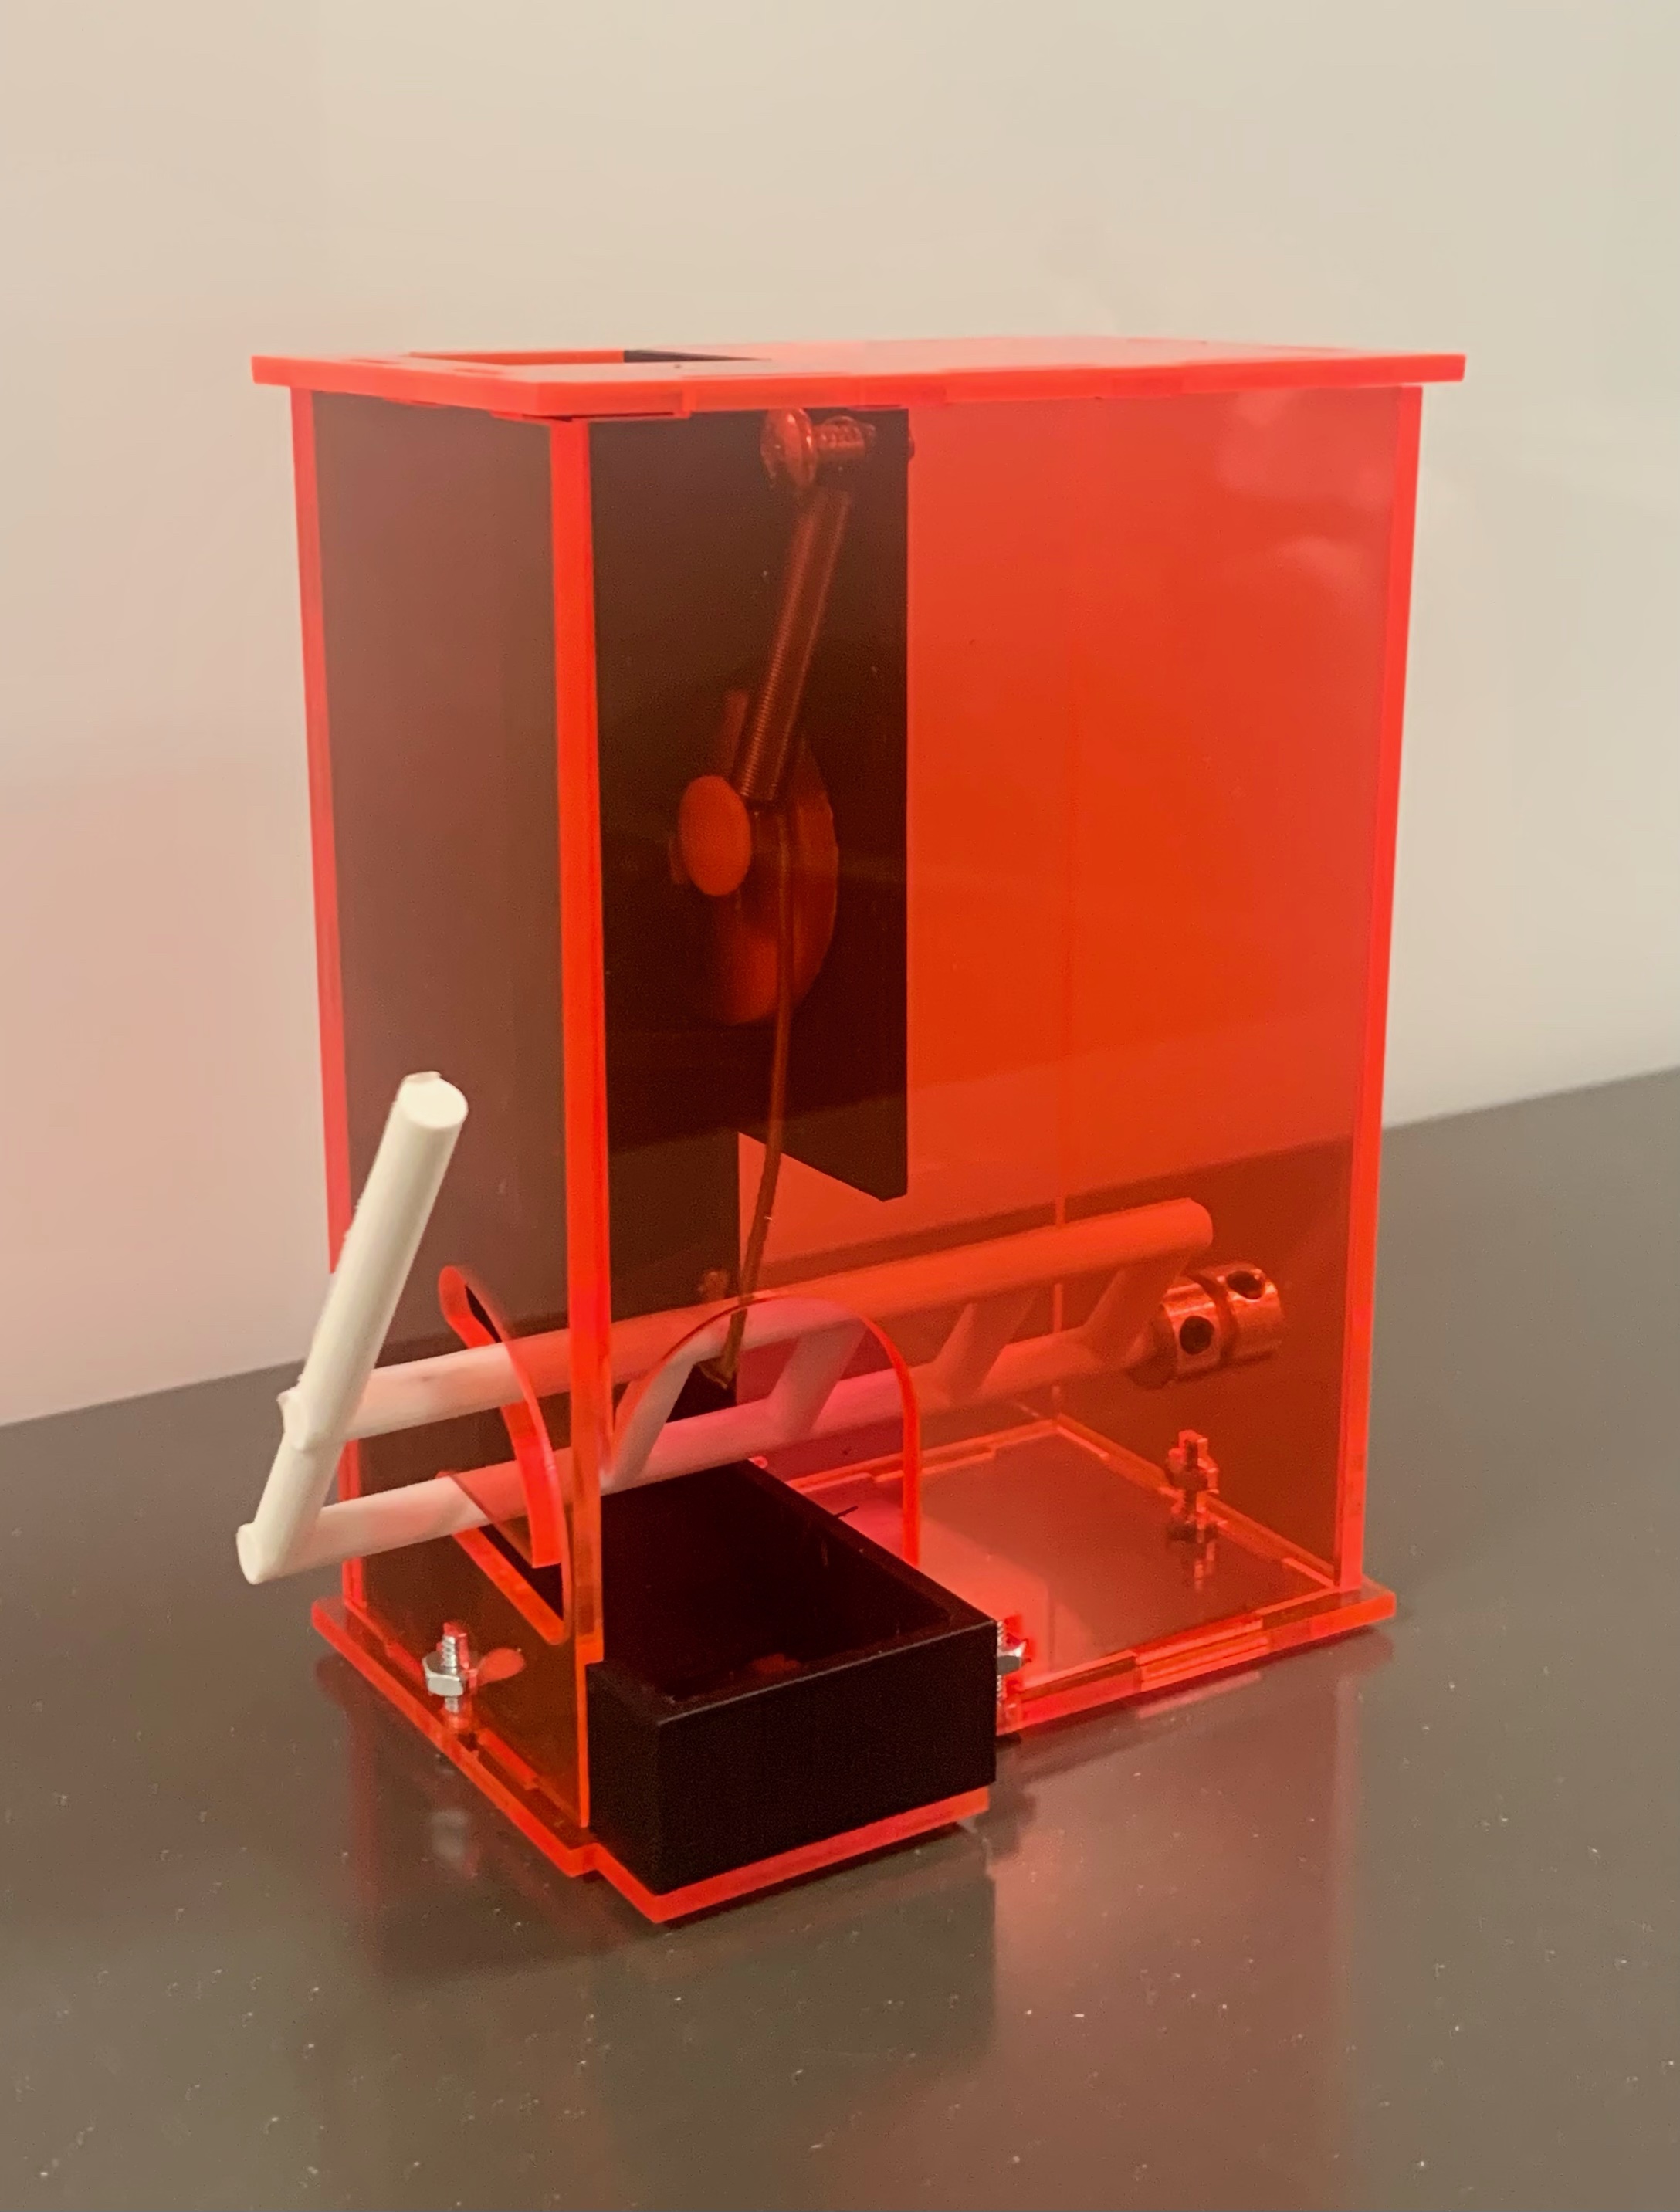
3D Printed Lever
I took inspiration from a ladder in designing my lever, as I wanted the bar that would be connected to the disk to extend all the way to the lever arm, to increase the moment. The dispenser wall has an arced slot to guide the motion of the lever arm, and it is secured using 2 collars to prevent wiggling.
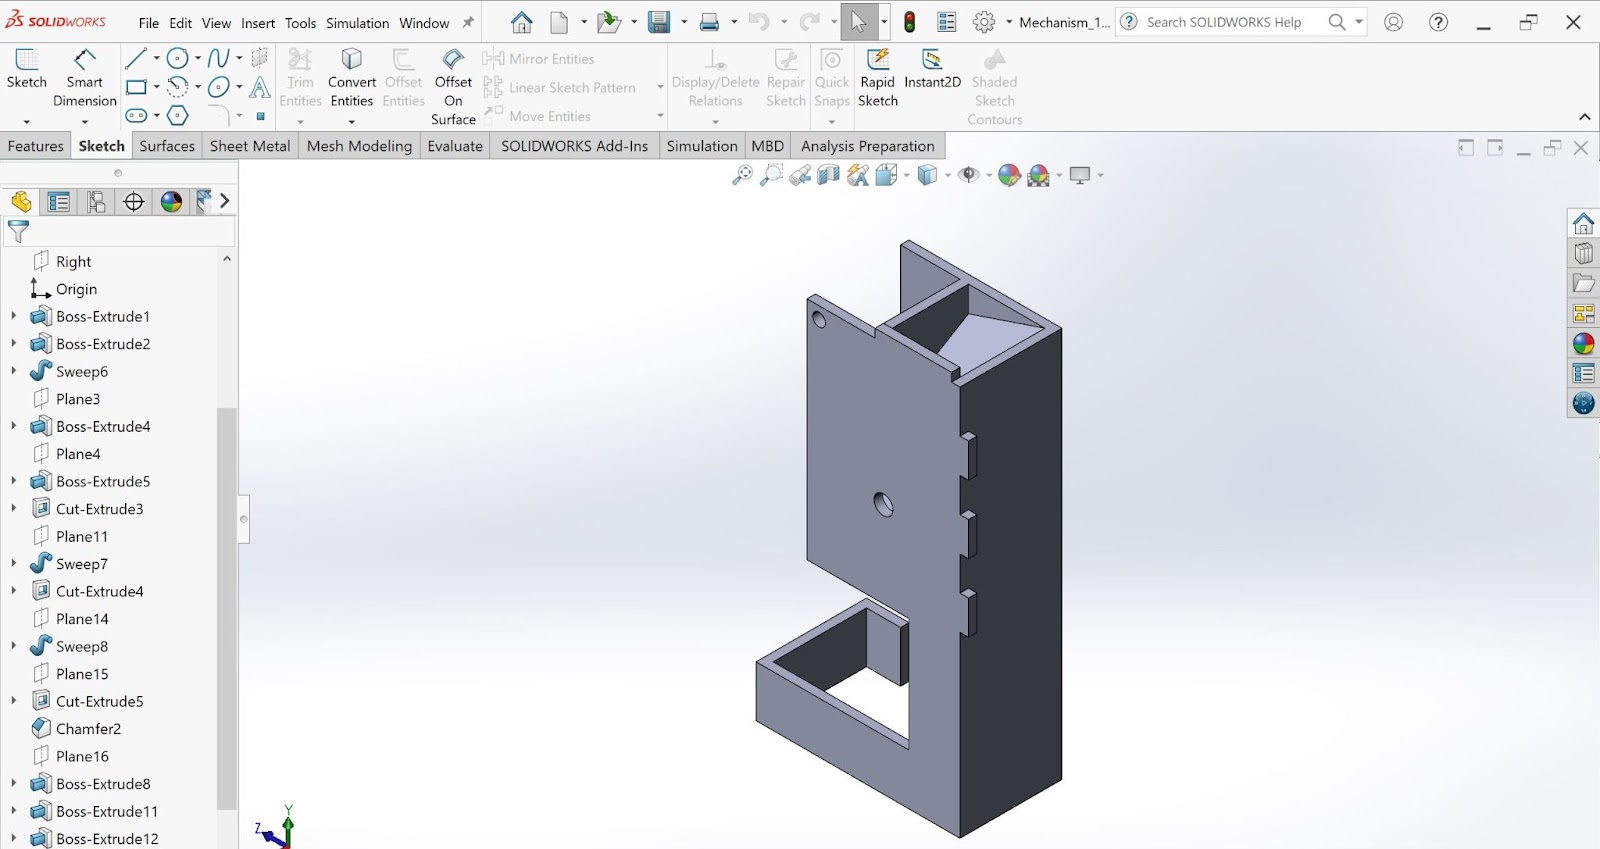
Interior Mechanism
I wanted to create one unified piece for my interior mechanism, because of my inability to use adhesives, I wanted everything to be secured in one piece. I constrained the piece within the box with tabs on top and behind it. I also wanted to create a channel for the disk to rest within.

Tweaking the Interior Mechanism
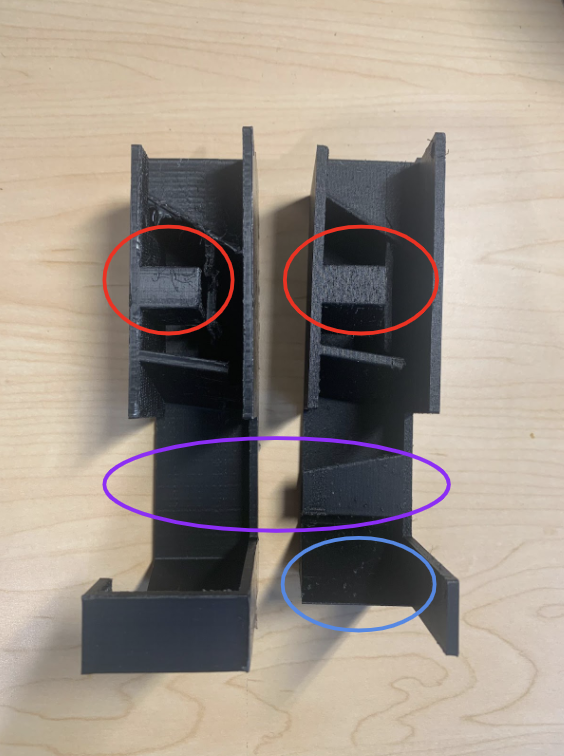
In all honesty, the interior mechanism required a couple different iterations with my personal 3D printer in order to function properly. I faced a couple issues due to 3D printing shrinkage and miscalculation, and I needed to tweak my model each time:
- The hole in the compartment to store the candies was too small
- The channel to hold the disk was too narrow
- The candies would bounce too much if there was no ramp/path for the candies to follow (circled in purple)
- The shelf that the candies were initially supposed to land on (circled in red) was too obstructive in assembly
- If the ramp (circled in blue) was too long, it would interfere with the hex nut that was fastening the box together
After much tweaking, the final CAD model was ready.
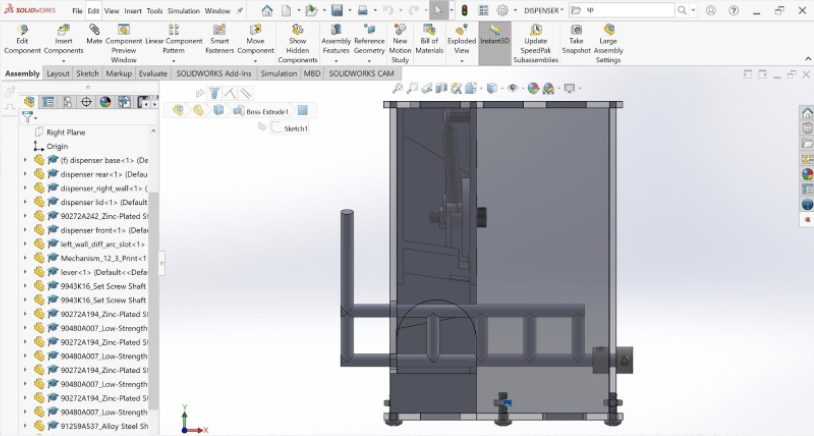
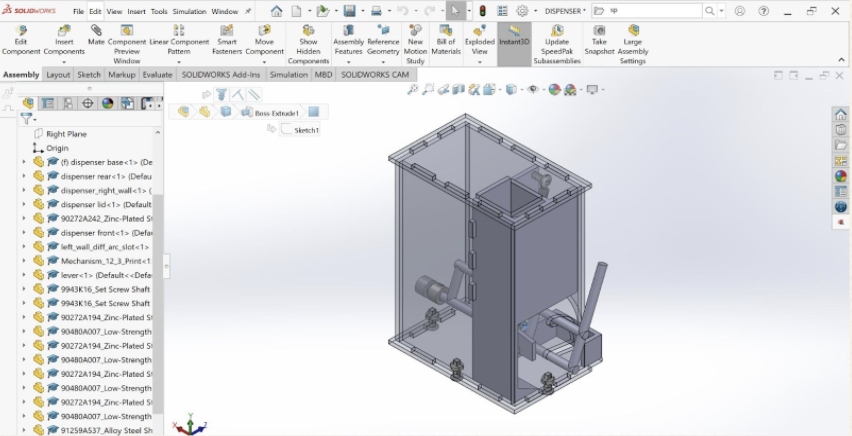
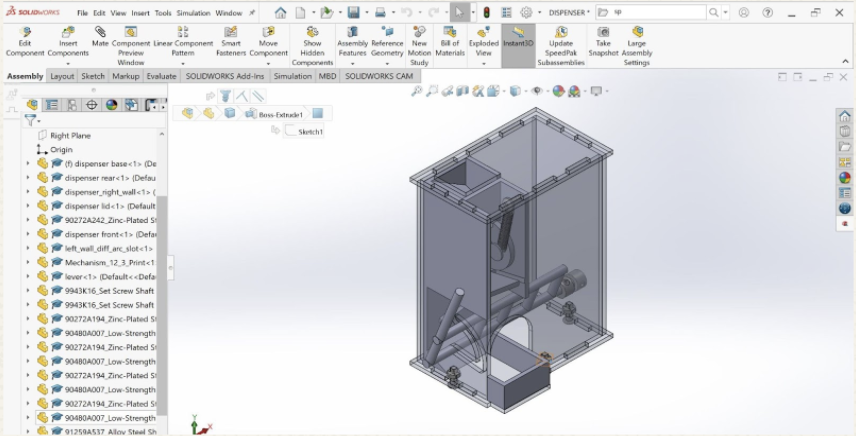
The CAD Assembly
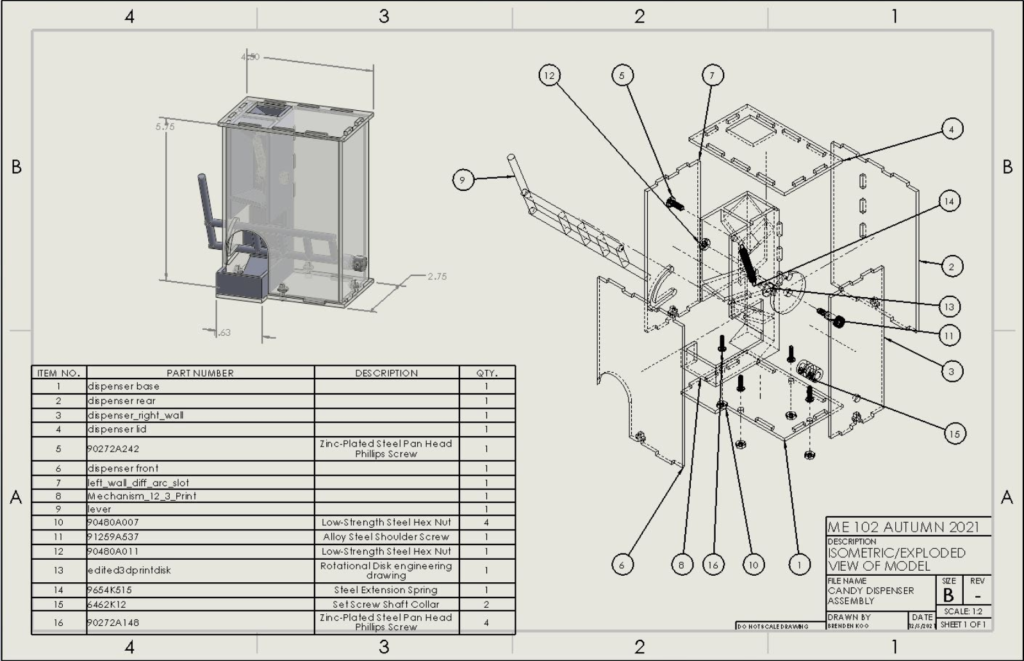
Bill of Materials
| QTY | Part Number | Description | Cost / unit | Cost |
| 1 | 90272A242 | 10-24 x ½” Zinc-Plated Steel Pan Head Phillips Screw | $0.05 ea | $0.05 |
| 2 | 6432K12 | Set Screw Shaft Collar, ¼” | $1.25 ea | $2.50 |
| 4 | 90272A148 | 6-32 x ½” Zinc-Plated Steel Pan Head Phillips Screw | $0.03 ea | $0.12 |
| 4 | 90480A007 | 6-32 Low-Strength Steel Hex Nut | $0.02 ea | $0.08 |
| 1 | 91259A537 | ¼” Alloy Steel Shoulder Screw, ½” length | $1.25 ea | $1.25 |
| 1 | 90480A011 | 10-24 Low-Strength Steel Hex Nut | $0.02 ea | $0.02 |
| 1 | 9654K515 | Steel Extension Spring | $1.05 ea | $1.05 |
| 2 | 12 x 12 in Acrylic Plastic, Fluorescent Red | $3.50 ea | $7.00 | |
| 2 | 3D Print | Disk, Red Generic PLA (5g) | $0.39 | $0.78 |
| 1 | 3D Print | Lever, White Tough PLA (13g) | $0.93 | $0.93 |
| 1 | 3D Print | Interior Mechanism, Black Tough PLA (72g) | $5.23 | $5.23 |
| Total | $19.01 |
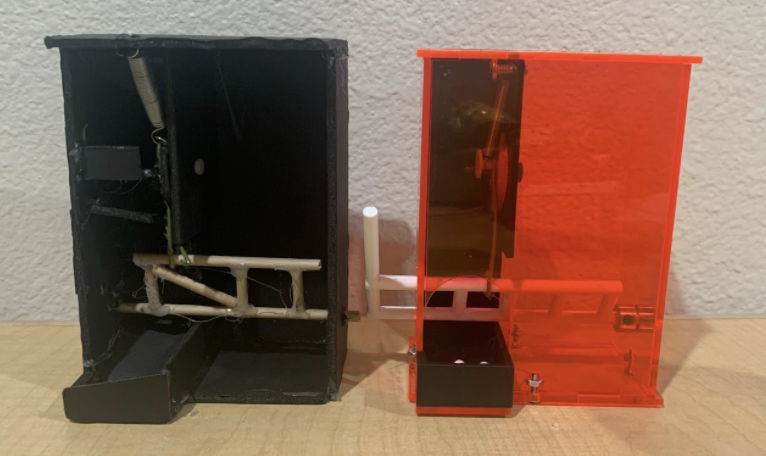
The Final Product
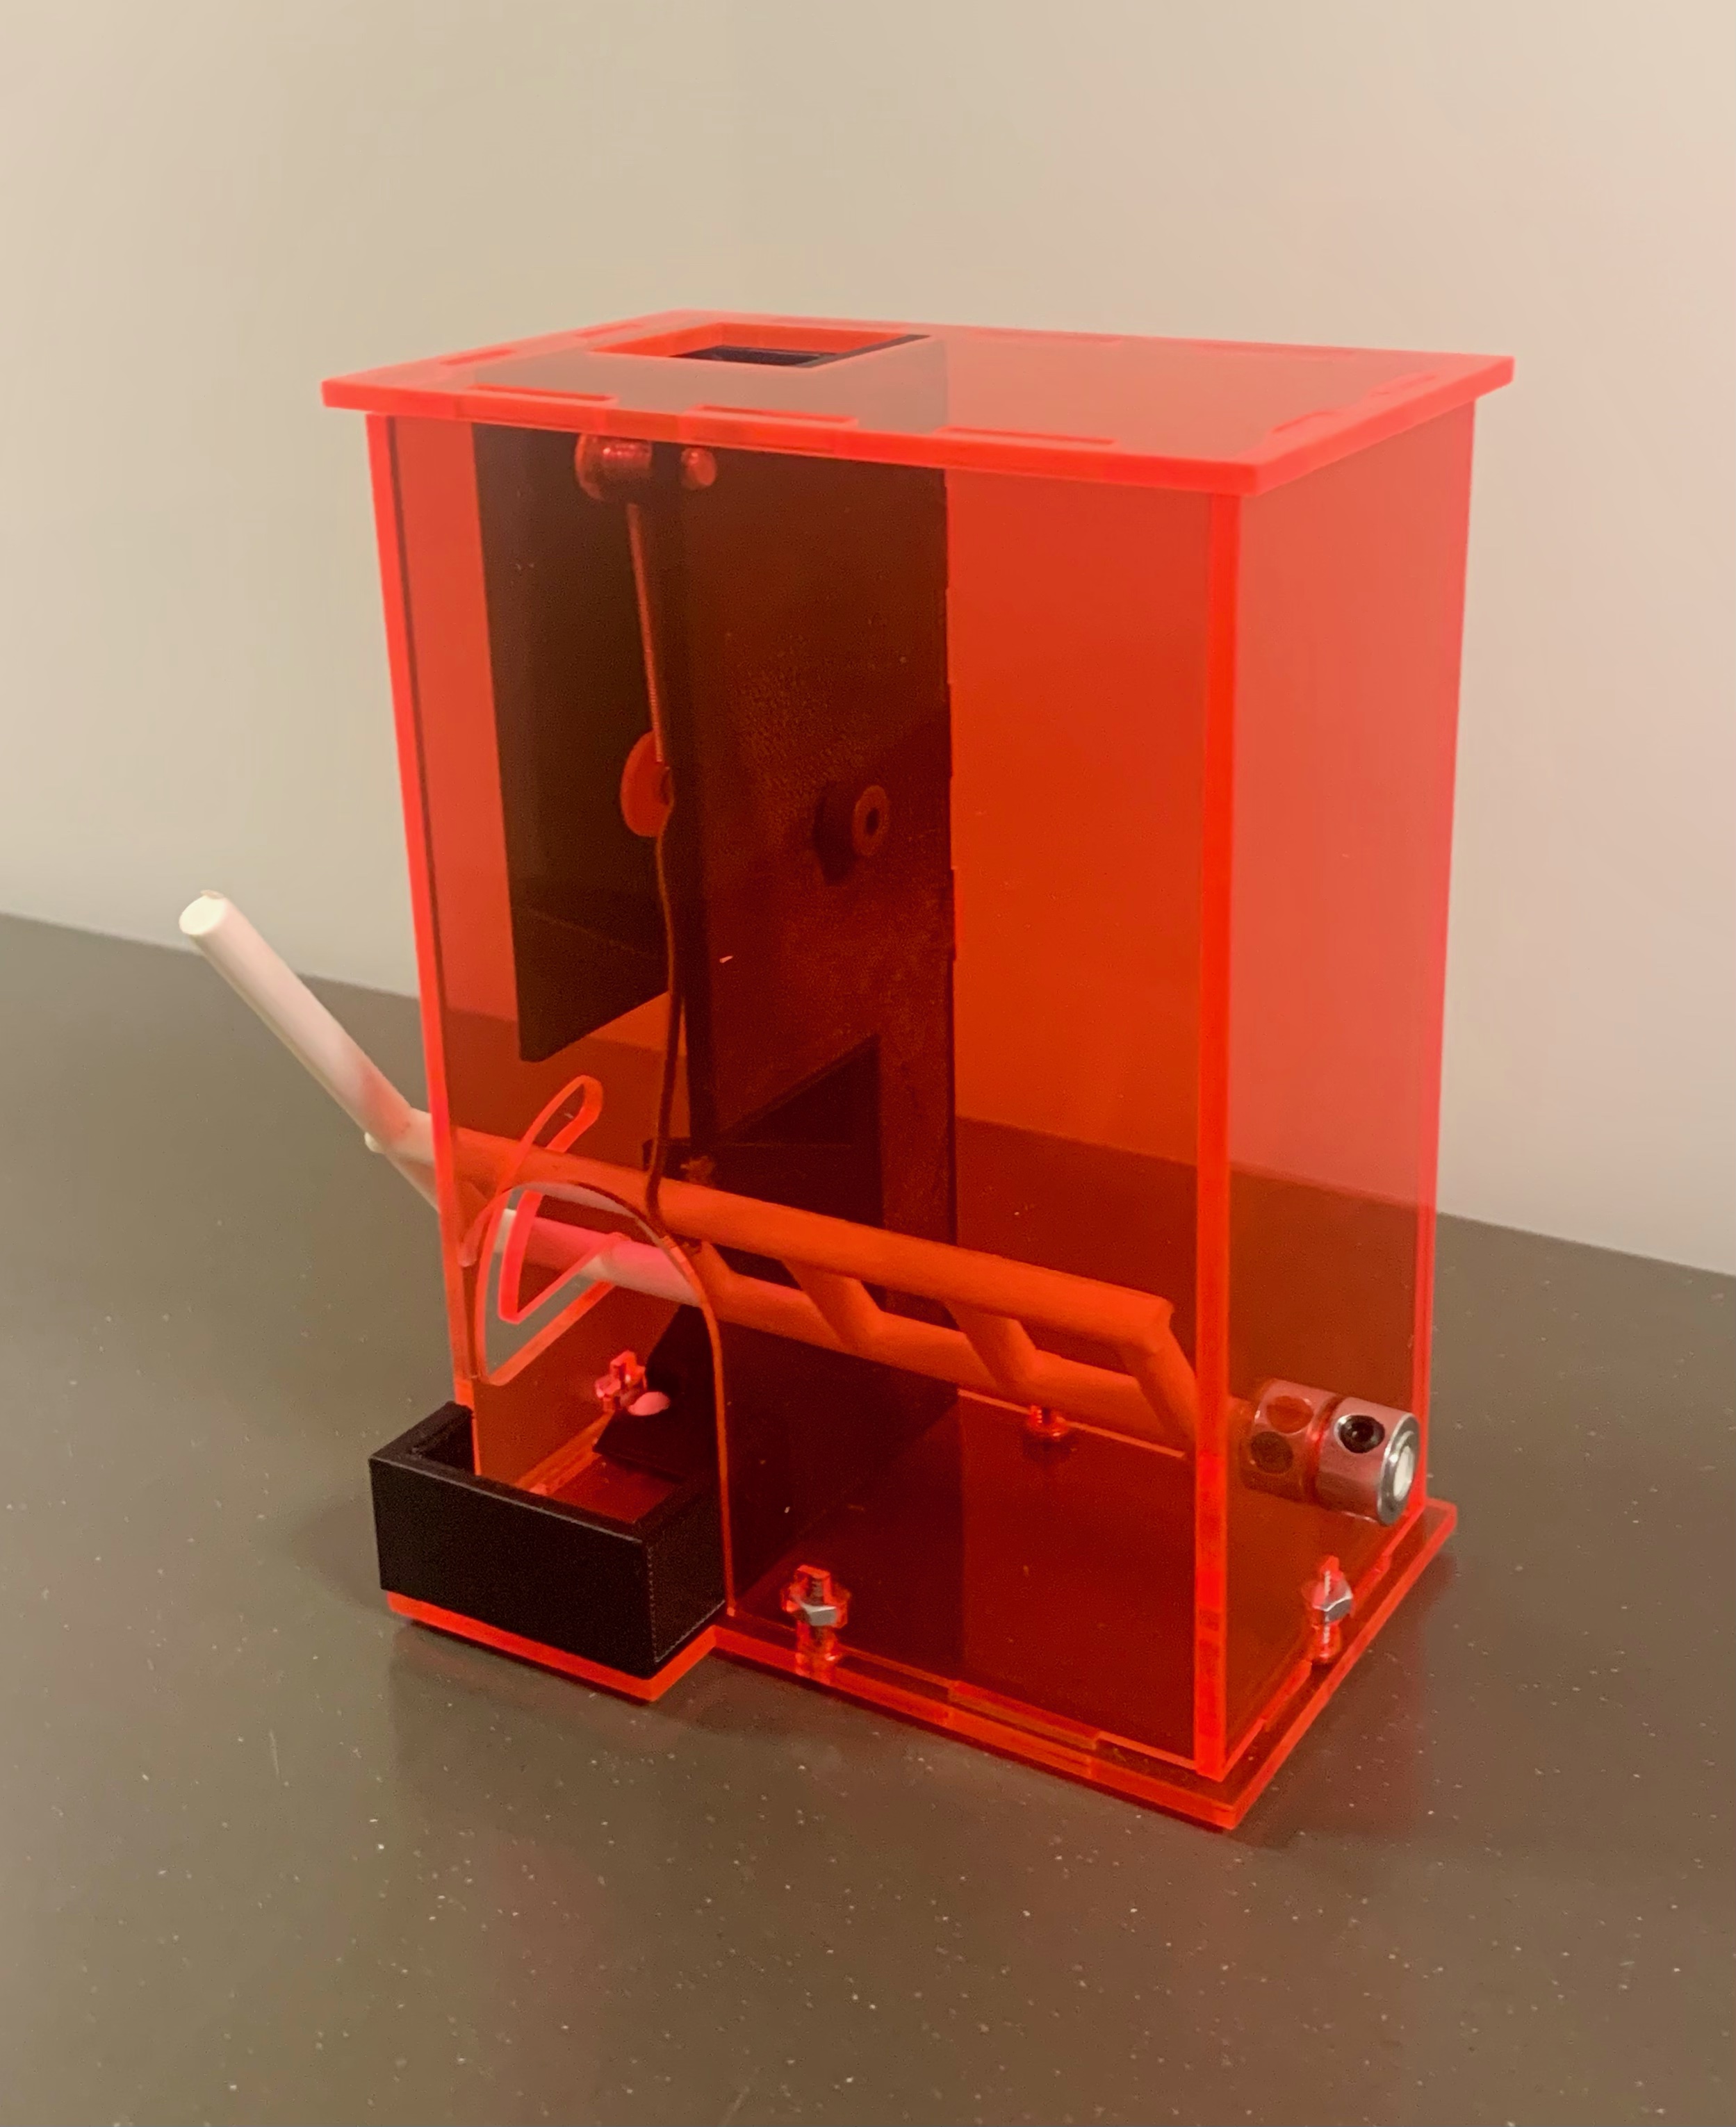
Analysis
Overall, my dispenser does function as intended, as it fulfills each of the requirements as outlined in the assignment guidelines. As there were a lot of tweaks and improvements made in each prototyping stage, the final product has evolved greatly since the initial concept sketches:
My initial design had the rotational disk situated next to the storage compartment and the actuation was intended to align the openings in the disk and the compartment wall, so that the candies would just pass through. However, I realized that this method made it difficult to dispense one candy at a time—if the lever was held down, numerous candies would tumble out. I thus edited my design so that the resting state of the dispenser would separate the to-be-dispensed candy from the compartment, so that the actuation would just release this already separated piece of candy. I specifically designed the disk to achieve this by creating a groove that would perfectly fit one piece of candy, and situating the disk directly beneath the opening of the compartment so that the next candy would be ready to enter the groove of the disk, but only after the dispenser is reset. I also changed the reset mechanism by connecting the disk to the top of the box via an expansion spring, as opposed to using it to connect the disk to the lever (for which I now use a static wire).
I found that this method of approach was extremely effective, as my functional prototype was a just that—functional. However, I was not fully satisfied with my prototype, as there were issues with input (the lever needed to be actuated from inside the dispenser) and spring mounting (the way that I had attached it to the dispenser had slightly bent it). I solved my input problem by creating an arced slot in the wall to which the lever arm was adjacent, and solved my spring mounting problem by using extrusions and screws to secure the ends of the spring. With a few minor adjustments to my CAD models to allow for 3D printing shrinkages and tolerances, my model was ready to assemble.
In terms of next steps, I found one concern with my reset mechanism. Although the reset functions perfectly, I wish that the lever arm would be brought straight up to a vertical orientation when the dispenser resets. Even though this is a purely aesthetic concern—and does not impact the functionality—I believe that editing the point at which the disk connects to the static wire would solve this issue, as the wire just needs to be more taut. As the dispenser functions perfectly, however, I do not have any unanswered questions.
Reflection
Throughout the process of creating my candy dispenser, I have learned so much about my design process. I realized that, as pictured below, I am a person who likes to have his functional prototype very closely resemble the final product, because I find solace in knowing that every aspect of my design is fully functional before I even start 3D modeling it. Although it was a useful tactic in this context, I wonder if I might fare better if I spend less time on my functional prototype—only creating the mechanism and not worrying so much about the aesthetics in the prototyping process. I also realized that since I am a bit of an indecisive designer, I took a lot of decisive design action. For example, once I had an idea that I believed will work, I chose to play it safer with a simpler design rather than designing something complicated and worrying if it would even function. However, this might have led to me not even considering more creative alternatives. In the future, I hope to take more risks with my designs—i.e. using a launch mechanism instead of a passive dispensing action. Had I taken more risks and spent a little more time brainstorming my ideas and options, my mechanism might have been a little more advanced. Ultimately, although I do believe that I played it a little safer with my design, it made me more confident in 3D printing and laser-cutting my pieces, as I strongly believe that I would be hesitant to print anything if I even had a shred of doubt that it would function properly. However, this did not mean that I did not face any challenges in my process. A large obstacle I ran into was designing my CAD models with the proper tolerances to account for shrinkage from the 3D printer. Numerous times, since I had calculated every aspect of my mechanism perfectly, I ended up having to file down the through-holes in order to fit the proper hardware. Another challenge was definitely the assignment restriction against adhesives, as I had to place tabs and fasteners in creative places, use collars and arced slots, and also account for perfect/press-fits. Moving forward, I have a better sense of who I am as a designer—playing it safe never hurts, as the ultimate goal is to achieve functionality. However, I can sometimes cave into my inner overachiever and take some design risks now and again, even if it might make life a bit more interesting.